
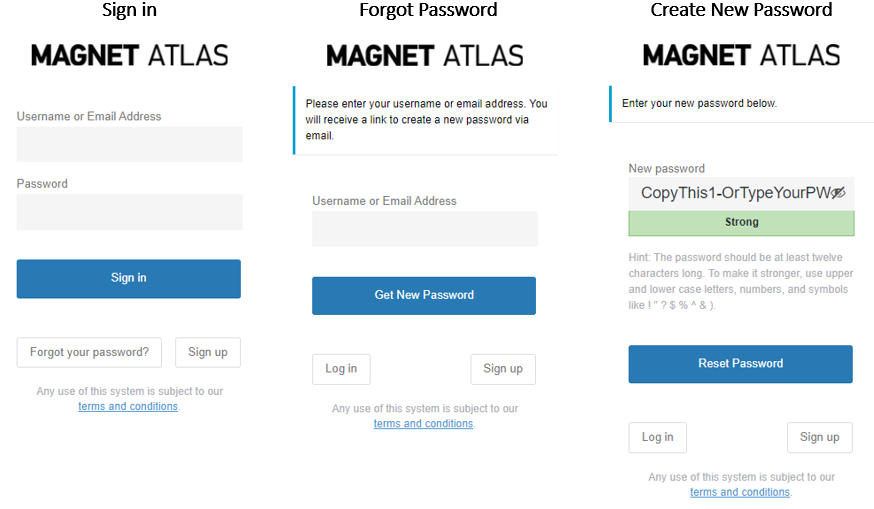
By navigating to the assigned URL, users reach ATLAS by using their system assigned credentials. Users may select the “Forgot your password” function to work through sign in issues. Users select the “Forgot your password” button and enter their associated email address in the window. An email is sent to the user with a link to assist them in resetting their strong password.
Passwords may also be manually reset by Executive and Manager level users on the system. See the Edit Users and Manual Password Reset section for more details.
When creating a new password, users can use the suggested strong password visible in the “New Password” field or may enter their own password. Password changes are not active until the user selects the blue “Reset Password” button to submit the request to the system.
If ATLAS has been deployed in a manner which permits external notifications, users receive email notifications when their credentials are used for both successful and unsuccessful attempts to log into the system. System logs record successful and failed access attempts.

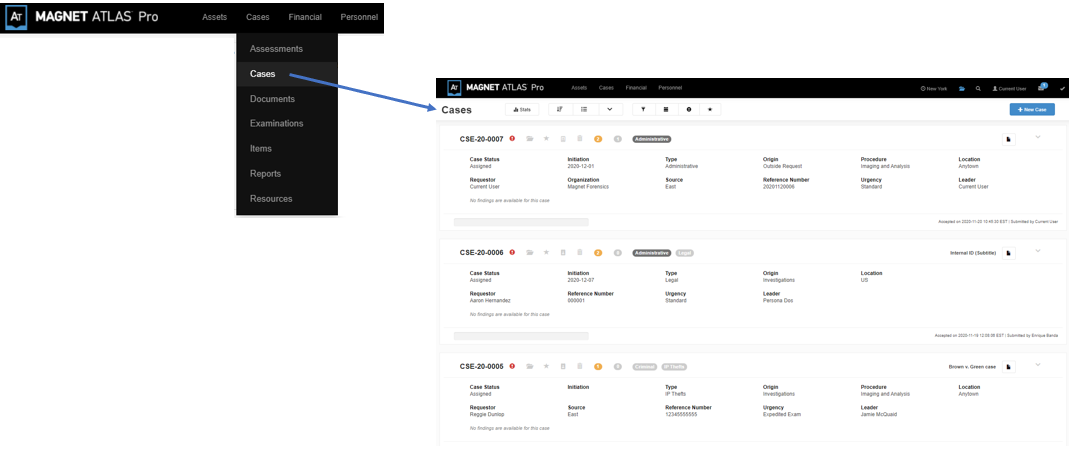
Log onto the system using ATLAS credentials. See the user configuration section for more detailed information for user credential creation. The case management tools can be located on the upper menu bar. Selecting the Magnet ATLAS Pro logo from any page takes the user back to the home page.
Tabs on the upper menu direct the user to specific index pages. Select “Cases” on the main Cases menu to navigate to the Case Index to begin the case creation process.

Below the black Top Menu Bar on each page there is a row of buttons which assist in filtering, ordering, and viewing stats from the current index view.

Selecting the green “Submit” button when creating something new, or green “Update” button when editing a record, is how users save information within the fields on any of the forms.
Submitting a new item saves those entries and presents a new blank item form to create another item. This is consistent with creating other new objects such as Reports, Documents and Assessments. Simply close out the blank form when no additional objects will be added.
Browser messages may appear as an indication the user has attempted to navigate away from a page on which unsaved edits have been made. Select the “Update” button often to retain edits.
New users may be added by to ATLAS in two ways.
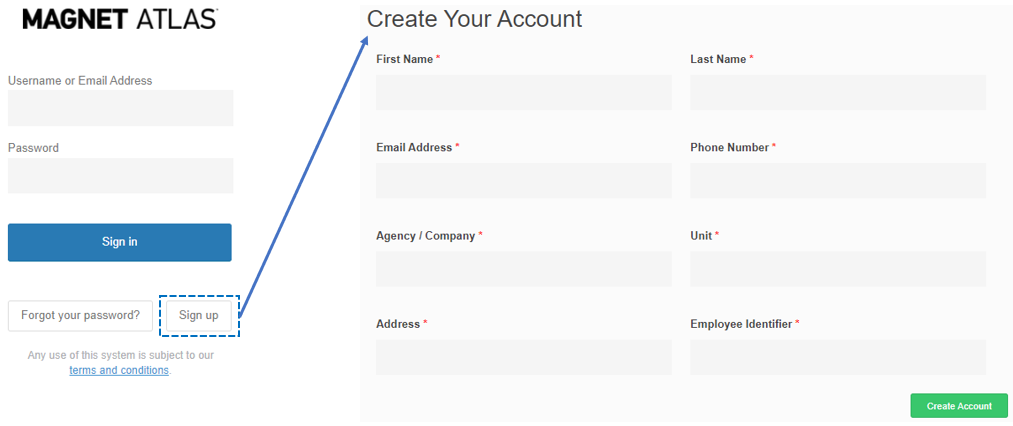
Regardless of how the new user account was added to the system it begins as a read-only user. Executives or managers may then navigate to the Manage Users utility and select the black "Security" button adjacent to the new user's name and elevate examiner level users, when necessary, to the appropriate access level dependent on number of licenses.
Read-only users may use this same “Sign up” method to create credentials, or an exec or manager may use the "Sign up" method to create read-only users. Those users remain read-only and, if enabled, may make formal requests for services by using the submission form. Examiners may add the read-only users on a case-by-case basis to the dissemination list, by using the restrict access utility. An option in Settings on the Security tab defines if read-only users see the entire case when added or just their individual case index with findings.
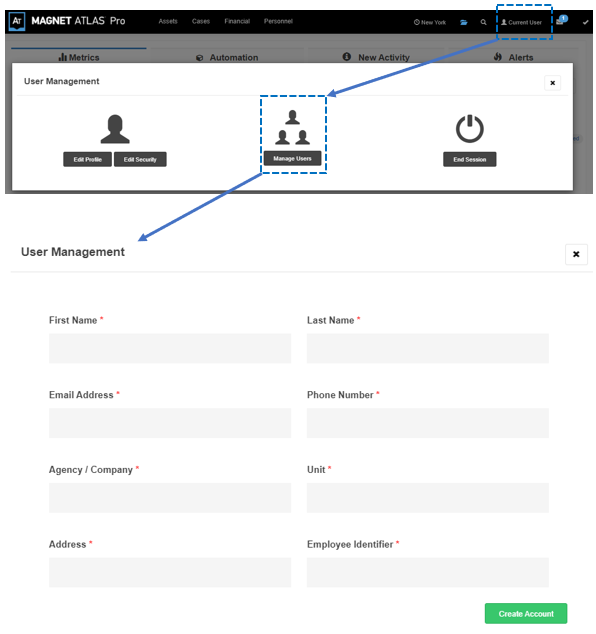
User account details may be edited by opening the user management modal and then selecting the user's profile that necessitates editing. If it is your own profile you wish to edit you will note your name is not listed in the list in "Manage Users." Your profile is accessed by selecting the "Profile" button. The fields are self explanatory when creating and editing user profiles.

Select the Security button to edit a user’s role or reset a password.

Manual Password Reset:
When possible encourage the users to use the “Forgot my password” utility on the sign on page to reset their own password. Using the "Forgot my password" method from the sign in page is the simplest method to change passwords if email notifications are allowed to be sent from the system.
However, executives and managers may, when necessary, manually reset a user’s password.
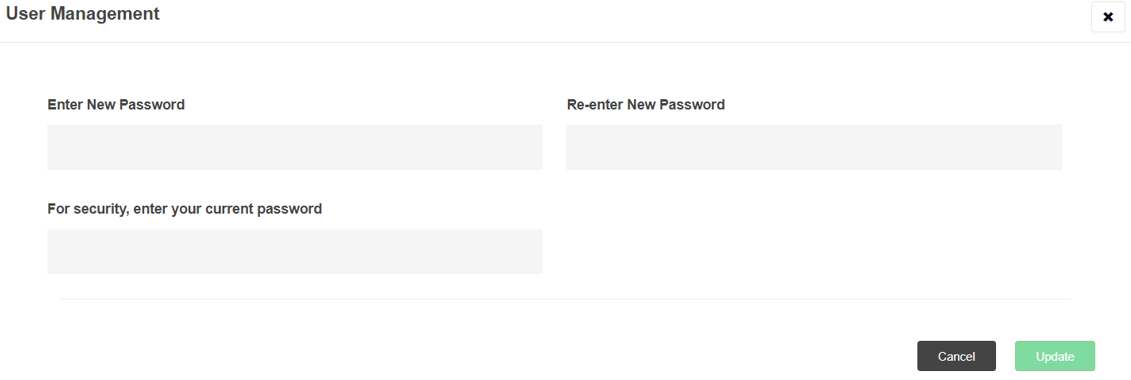
From the Manage Users modal select the "Security" button adjacent to the username in question and then the button labeled Manually Reset Password. Enter the other user’s new password (twice), and then enter your password to verify you have the authority to change the other user’s password.
NOTE: This verification password (the lower field on the second row) is not the user’s old password. It is the person’s current password who is manually changing the other user’s password. Even when changing your own password the upper row is the new password and the lower row is your current password.
Reset Default Role Permissions:
Default role permissions are not individually defined by users within ATLAS. There may be times when maintenance updates require the default roles be refreshed. If this is needed there is a button to reset permissions at the bottom of the page in the User Management modal.
More restrictive permissions for information may be defined and facilitated by using Classified Case Tags in Settings on the Security tab.
Users are provided the appropriate level of user credentials as determined by the ATLAS “System Executive(s).” User roles for examiner level editing users are Executive, Manager and Contributor. The remaining roles are more narrowly focused on specific responsibilities.
The following roles are available for assignment.
Executive
Has the highest level of access and has complete access to the system. The Executive can read, edit, and delete any user’s content as well as create new and edit existing user accounts. User accounts are never deleted, but instead deactivated when access is no longer granted. This keeps any information created within the system associated to those users even after they are deactivated. Executives can access cases whether specifically assigned access or not. Adding executive users as the case leader or to the case’s access list displays their name on the case reports to which they are actively involved. Executives can review the combined system logs located in Tools in the bottom footer as well as logs within individual cases. They can access system settings and taxonomies located in the footer to configure organizational system pre-sets.
Manager
Has all the privileges as the executive level user to read and edit any user’s content. Managers cannot delete other users’ content. Managers can access cases whether specifically assigned access to the case or not. Adding manager users as the case leader or to the case’s access list displays their name on the case reports to which they are actively involved. Managers cannot review the combined system logs, but can view logs within individual cases. They cannot access system settings. Managers can create and edit taxonomies.
Contributor
Is a primary editing level staff member. Contributors can create new cases and assign a leader to any case they create while they have access to it. Contributors are added to the access list by default when they create a new case. They can be removed from the access list which removes their ability to see the case contents. Contributors can read and edit work they create within cases to which they are assigned. Contributors can read and edit other users’ work within cases to which they are assigned. On the contributor home page, as well as on the case index, contributors only see cases to which they are assigned as the leader or added to the access list. Contributors cannot view logs. A contributor home page displays a list of their cases on the left and their recent exams on the right.
Read Only Limited
Is the role assigned to those who have a legitimate need to read information within specific cases. These users may be the submitting requestor, case agents, detectives, officials, and prosecutors who will use the digital forensic work within their investigations or inquiries. These users are restricted to only those cases and information to which they are included in the “Restrict Access” (dissemination) list for each individual case.
Read Only System
Has system wide read only access to all cases and information unless such information or case is further specifically restricted. (See more later for information about Restrict Access topic)
Supervisor
Is a role associated to user groups. This role may supervise activities of others within the same assignment group defined in Settings. Supervisors may create, view, assign, and edit cases within their own group for which they are the supervisor.
Authorizer
Is a role when the system is configured for pre-authorization. This user can view newly submitted cases received from the Request Form and has the responsibility to approve or deny authorization for those cases for further investigation. Executive level users may also authorize or deny cases. Executives can see all the casework whereas Authorizers only see newly submitted cases prior to authorization or denial.
Affiliate
For use only with the ICAC module. Is used for ICAC statistical reporting. Affiliates report their statistics to a central ICAC task force. The TF uses the Affiliate role to assist in determining what agencies are expected to report those stats through the TF. The Affiliate users do not have access to any of the Case information including Evidence and Examinations.
Recipient
For use only with the ICAC module. Is a user who receives Cyber Tips. This function can be used within a single agency to distribute sensitive information within an agency or this functionality can be used to distribute sensitive information outside of an agency to affiliate agencies.
Configuring ATLAS before first use will assist in the transition to the system. There are several dropdown lists (taxonomies) and settings the system executive user(s) should consider addressing from the beginning to help with the onboarding process. The System Settings and Taxonomy Manager are both accessed from buttons in the lower right of the ATLAS UI footer.
The taxonomy manager is located on the right side of the page footer. Taxonomies are the user defined categories that populate the dropdown lists on the various records and are also filters by which the related indexes may be filtered.
Each record has its own set of taxonomies. Most of them may be created as nested lists when necessary with primary types and sub-categories to create the nested lists. As examples, an unauthorized access case type may be a sub-category of an incident response primary case type. Similarly, burglary may be a sub-category of a criminal primary case type. This same nested list theory is true as related to locations, origins, and other taxonomies.
To get started using ATLAS it is suggested, at a minimum, consideration be given to creating the case taxonomies, items taxonomies and exam taxonomies. As will be described also in the Case Creation section, taxonomies can be added “on the fly” by hovering on the taxonomy field in an edit modal and selecting the “Add New” function that will appear at the top right of the field over which you are hovering the mouse. However, if the team has several users it may be more beneficial to populate as many of the taxonomies as practical in the cases, items and exams. There are some fields that likely will always be populated on the fly such as Item Custodians who are generally the owner/user of a device. But there are a number of taxonomies that can be populated at the start to better assist the team with onboarding.
When possible consideration to the following taxonomies should be given prior to first use:
Offense Type: appears on the request form and cannot be created by read-only submitters using the form.
Sources: appears on the request form and may be used to route cases based on the submitters’ division, region, department, bureau, etc...
Procedures: for statistical purposes these tags generally group the cases by procedures defined in this taxonomy. Keep in mind the result would not tell you with this filter how many chip offs were done. It would provide how many cases involved chip offs. More granular stats would be aggregated from the examinations within the cases.
Case Tags: if "Classified Case Tags" will be utilized to limit access to specific users listed as the case leader or those on the access list for a case at a minimum these terms must be added here in order for them to be selected in Settings on the Security tab to activate that functionality. Other generic case tags may be added for which case stats will be aggregated, or they may be used to filter cases to focus case stats on defined topics of interest. Example uses may be to tag cases with loss values in excess of certain amounts. Other uses could be to create tags for active and lifted holds, and apply them to eDiscovery type cases to count how many eDiscovery case holds are active, and how many are released. Law enforcement users may consider tags such as weapons, deaths, overdoses etc. to apply to violent crime or narcotics type cases to have stats for how many of those cases involved gun violence, overdoses and deaths.
Types: are a significant statistic and metric. In addition to appearing on the case page, Case Types also appear beside the case names in the index and may be color coded for topical emphasis.
Locations: are a significant statistic in the filtered stats and the metrics page. Are geographic designations usually associated to regions, jurisdictions, cities, towns, etc…
Origins: are usually organizations, people, teams, bureaus who request services and may be closely related to locations. Origins for example could represent the legal department who makes requests for services in several locations. In law enforcement origins may be viewed as including an external agency while also creating a nested list of internal sections or bureaus within their own agency for more granular stats.
Self populating taxonomies: need no input as they are created during the normal workflows. Leaders, requestors, years, and periods usually need no additional terms.
Movement Purpose: appears on the Movement modal when making a chain of custody transfer. It is displayed on the chain of custody (Evidence Log) indicating the reason the transfer occurred.
Device Types: this list creates the terms displayed in the Back Log chart on the metric page. Item device types also become filterable terms by which the Items Index may be focused.
Item Custodian: is usually the user/owner of a device and likely will most often be populated on the fly from the Item edit modal.
Item and Image Location and Sub locations: The ability to efficiently move and track evidence is helped by configuring available storage lists as part of the initial setup of ATLAS. The Item Locations and Sub locations as well as the Image Locations and Sub locations are most easily configured by using the Item taxonomy manager in the settings utility accessed in the bottom footer. These four lists are configured in pairs, two for Items and two for Images.
Item Locations: can be thought of as facilities if the users’ agency has more than one physical location. In this instance one might use the facility’s name or geographic name. i.e. New York Lab, Dallas Lab, or Lab #1 and Lab #2.
In the instances where there is more than one physical location there may be some generic location descriptions along with those facility descriptions.
i.e. LE: Scene, Receiving, Facility 1, Facility 2, Court, Digital Lab, Forfeiture, Returned, Destroyed
i.e. Corporate: HR, Legal, Receiving, Facility 1, Facility 2, Digital Lab, Returned
Item Sub locations: can be created as granularly as needed. These can have relationships to some of the Item locations to create nested lists. As an example, Facility 1 is a location that may have an evidence room which contains a locker that has shelves which contain bins. All the sub locations are linked to the “Related Location” when creating the sub locations. The sub locations may also contain parent/child relationships within a related facility. Effectively what this does for the user is when they choose a facility as the Item location, only the exclusive list of storage at that facility becomes available within the sub location selector. By using this methodology users may later do inventory control by filtering on those locations and sub locations to create focused lists, or inventories.
Image Locations: are usually server arrays or external media where the data movements are recorded to allow users to track chain of custody for all the data within an investigation. The relationships between Image Locations and Sub locations are configured similarly to the methodology for Items. The difference is they describe data movements. A basic setup for efficient data tracking would be to use Image Locations to describe the primary storage types. i.e. Primary Server, and External Media
Image Sub Locations: may not be needed for a server selection. So the first choice for Image Sub location may be “Not Applicable” when selected with “Server” as the Image Location. The Image tab on the Item page contains the file path location for storage for reporting purposes. These taxonomy configurations are for movements and inventory purposes. The remainder of the Image Sub locations may be actual external drives with a “Related Location” as External Media. This creates a workflow for when the user selects “External Media” as the Image Location, the user only sees external drive choices for sub locations. i.e. Not Applicable, Drive 1, Drive 2, Drive 3, Drive 4, etc…
Inventory control is accomplished the same way for data by filtering the appropriate Image Location and Sub locations to create a focused list or inventory.
Item Tags: are similar to the generic case tags. They allow users to define topics of interest by which stats are aggregated in Evidence Stats or used to filter the Item Index to produce a focused inventory. As an example, creating an Item Tag with a term representing items that are "Locked with no bypass" would produce a statistic showing how many of these devices are in their current inventory. It would also allow the users to filter their evidence index by devices in their inventory for which they currently cannot access the data. As technology changes and products make access possible, the users can filter their evidence by that "Locked with no bypass" term to determine if anything in their inventory is possibly accessible by the new technology. As items are successfully identified and successfully accessed, the "Locked" term would be removed and replaced with a term that represents a successful exploit was procured to produce statistics over time for how often that scenario may have occurred.
Primary Examiners: is a list of the ATLAS users who do examinations. This taxonomy is what facilitates employee review of exam stats by filtering on an examiner’s name.
Operating Systems: can be populated by general terms such as Windows, Linux, Android, iOS, or may often be populated on the fly if more granular version details are desired.
Exam Device Types: it is suggested the “Item Device Type” list be created first and then recreate that list for “Exam Device Types.” The exam device types can be used to filter the exam index to focus stats on exams performed on specific devices.
Self populating taxonomies: need no input as they are created during the normal workflows. Exam case numbers, exam years, and exam periods usually need no additional terms.
Exam Tags: are similar to both generic case tags and item tags. They allow users to define topics of interest by which stats are aggregated in Examination Stats or used to filter the Exam Index to produce a focused list of exams from which statistics are created.
The Settings utility contains numerous system pre-sets and labeling options accessed by selecting the Settings button in the lower right footer. Only Executive users have access to Settings to configure the system.
This set of fields contain the organization name and location of the ATLAS licensee. Individual agency logos may be uploaded which appear on the Findings and Chain of Custody Log. The Date Format selection allows the system to use one of three selections. m/d/Y, d/m/Y, or Y-m-d. On the General Settings tab On/Off selectors allow Executive users to enable or disable additional features in ATLAS.
Display Name on Login Page
When enabled displays the current text entered within the Organization Name field on the Sign In form so users who may have access to more than one ATLAS system can confirm to which system they are attempting to sign in.
New Request Form
When enabled allows read-only users the ability to submit cases through the submission form. This also allows read-only users access to edit their own profiles.
Index Findings
When enabled allows the lab team the ability to share Findings with read-only users via the Case Index of those read-only users. The Findings Expiration on the Case Edit modal is relevant to this field for limiting the amount of time Findings are accessible from the Case Index.
Enhanced Notes
When enabled provides the mechanism to record duration times for note activities as well as billable time for those actions.
Index Attachments
When enabled allows for the sharing of attachments from the index of read-only users in the same way Findings may be shared.
Custom Case Approvals
Enables/disables the additional approval processes defined in the Approvals tab.
Priority Score
When enabled provides a method of temporarily sorting the Case Index by the “Priority Scores” defined by the users. The scale is defined by the users. On the Case Index, clicking the “Order by” toggle in the upper menu bar allows for selection of “Order by Priority Score.” The list can be inverted by selecting the button beside the “Order by” button. The Case Index returns to the default order following a refresh.
Priority Score on Case View
Option to allow users to define if the Priority Score is also displayed on the case page beneath the subtitles or only is visible on the case index and case edit modal where it is populated.
User Groups
Enables an additional tab in settings to configure work teams or groups. See the Groups Tab instructions for more information.
Secondary Case Identifier
Displays the Internal Identifier field on the Case Edit modal. When populated the field becomes a subtitle on the Case page and is also displayed to the far right of the case when viewing the Case Index. The Internal ID is often used as a nickname or additional description for recognizing the case in a list when the naming lacks individual immediately recognizable description.
FPR Reporting
Forensic Partner Reporting is what the USSS requests from attendees of NCFI in Hoover Alabama. These take the same stats you already collect and re-group them into the USSS preferred reporting. NCFI attendees in the field provide these stats to USSS on a case-by-case basis.
Executive users can create unique API keys to pass information between ATLAS and other applications. Contact atlassupport@magnetforensics.com for additional information related to the use of the ATLAS API.
Processes may be defined within Settings to require specific steps or processes that must occur at different stages of the case. These processes may be inserted as Pre-Assignment, Pre-Submit for QA, Pre-QA Approval, and Pre-Close. As an example, a process could be defined that requires a supervisor or the legal department be notified before a particular type of investigation is assigned, QA approved, closed etc. If it were a Pre-Close process as an example, until (whoever is defined) verifies the defined process in that case has been completed, the Closed button would not be available to close the case. It could be a process to check the evidence room for any exhibits pending disposal for this case is required before closing the case. Any process may be defined and can be associated to one or more Case Type. Case Types can be excluded from association to a defined process. The process can be defined as requiring specific roles or even specific users required to verify the process before proceeding forward within the case.
The first modification utility applies separately to the Submission Form which can be used by read-only users to submit cases to the system. Executive users may define fields to “Hide” to prevent them from displaying on the form the submitting users see.
The Default Field Modifications utility allows other fields to be customized to meet the customers’ needs more closely. Users can rename, hide, or require most fields within the system. Field modifications may be made by selecting the black "Add Modification button near the bottom of the list of any existing modifications. Defining the page on which the field resides (Entity Type) then selecting the field to be modified allows users to edit existing labels. Adding text to the label field will rename the selected field with the current text. Fields may be hidden or required by selecting the respective toggles for each field. Editing the text in the “Choices” text boxes is the method users may use to customize the terms in existing non-taxonomy dropdown text fields.
Assignments may be routed to specific groups of users dependent on criteria defined within the Groups tab in Settings. Criteria may be defined that creates this routing based on Case Offense and/or Case Source selections on the submission form. This creates the workflow of auto-assigning cases to defined groups or users based on entries received at the time of initial submission using the web submission form. Additionally, assignments can be initiated automatically by editing a case and selecting a defined Case Type or by selecting Case Tags defined in Settings which causes a desired assignment.
The Leader(s) for a group receive both an email notification and ATLAS internal message when a new case matches any of the selected group criteria defined in Settings. By defining group members, cases may be assigned to a “Group” as opposed to individually assigned to an examiner, or both the group and individual examiners as the primary in that case. When a group or an individual user from the group is assigned a case, the Group Leader retains access to the case to oversee work assigned to the group unless additional security methods are subsequently utilized such as Classified tags.” Group priorities may be defined to force assignments to one group over another when criteria seem to be equal for assignment purposes.
The Interface Tab contains several settings which control how and/or when some data appears within the system.
Default Order By
Allows the user to set the default order of display for indexes to be based on sequence or name. Sequence always creates lists with the newest information at the top.
License Reminder
Determines how many days in advance of asset expirations alerts will appear on the home page alerts tab.
Years before archiving
Is a utility to allow searching of recent data in the initial search before including longer term records within the same search. Search results always present the user with a link to include all archive data within the current search activity. The option to edit those years allows Executive users to define what period of years is included within the initial search of near-term records vs. older records. The records are not stored differently based on this setting, only the time period in years included within the initial and subsequent pass through the records during a search.
Photos per Row
This allows users to set the default alignment for photos which are often included on the Item Page during intake and on the Examination page when recording work processes. Users can define the default display to be from 1 to 4 photos per row on the individual pages.
Activity Durations
These are fields to define what duration is allotted to a “Created, Assigned, Approved or Closed” activity when logged by the system into the activity charts and tables.
Chart colors
Four color selections that control the colors on charts appearing on the Metrics page.
Chart heights
Control the height in pixels for the trend line chart, bar charts, and circular donut charts located on the Home Page Metrics tab. The backlog bar chart is the one usually in need of more height if the number of item device types which creates the Y-axis of the backlog chart becomes too lengthy and begins displaying every other term. Increasing the height of the bar charts sufficiently will cause the backlog chart to display all the Y-axis terms.
Chain of Custody Location
By default, Item Chain of Custody entries may be viewed individually on the Item Page or with all items combined on the Case page by selecting to view the Evidence Log. Users can elect in settings to only view CoC entries on the combined log on the Case Page.
Examination Time Calculation
Prior to the activity time tracking from "Enhanced Notes" user could enter examination time on last tab of the Exam Edit Modal. With the update, time should be entered as part of the note taking process to create exam time stats. To aggregate stats from past entries on the Exam with newer entries on Exam Notes, this selector allows users to select using both, or either method for the purpose of calculating exam time.
Invoice Footer Message
Is a text field to customize the message that appears in the footer on the bottom of Invoices.
The Mail Tab is where email addresses used for notifications and email configurations are defined.
New Case Notification
Notification emails are sent to one, or more, email addresses each time a new case is created with ATLAS.
New User Notification
Notification emails are sent to one, or more, email addresses each time a new user is created with ATLAS.
Admin Email Contact
The Admin Email Contact field is for the email intended to be the first point of contact by system users for any issues related to their use of ATLAS. The Admin contact may request additional support from Magnet Forensics when necessary.
Email Body Heading
Allows editing of the heading in notification email.
Email Delivery
For ATLAS Pro systems deployed by VM, a selector for HTTPS or SMTP email delivery is in this section. When SMTP is chosen another field for SMTP JSON settings is displayed with a template for users to follow to create the settings. Email Debugging may also be enabled when using SMTP to add email events and errors to the application logs located in Tools in the page footer.
Test Email Setting
This button will send a test email notification to the Admin Email Contact address to verify email configuration success.
Most fields are self-explanatory. Automated naming is enumerated from the current case name, so the first evidence item in a case would look like “CSE-20-001-EVD-1” depending on the current case naming format selection. Other records would similarly be named based on the current case number when they are created. The automated naming can be edited or overtyped on any record within a case for customized naming requirements.
Case Number Type
When “Default” is selected the system uses the prefixes and formats defined on this tab in Settings. When “Custom: Reference Number” is selected that number, which may be populated from the Request form, becomes the primary case number. Selecting "Manual Year" is used for associating cases to a fiscal year method instead of calendar year.
Current Case Counter
The current case counter field enables Executive user(s) to define from where the sequential numbering begins. Numbering resets back to 0001 at the beginning of each year by default. However, one could edit the current case number to the last one used the previous year to continue counting forward without appearing to reset in the new year.
Case Year Format
Defines the format of the date to display with have several options including 2 or 4 digit years, years with months, and years with months and days formats.
Title Prefixes
These fields are where prefixes are defined and edited for any of the case records. Records are not required to have prefixes.
Number Padding
Allows Executive users to define how many digits make up the titles for Items, Exams, Assessments, Reports and Documents by adding leading zeros to the number. It makes no difference within ATLAS, but by adding at least one zero, users will find sorting exported inventories easier as the sequence sorts simply as EVD-01, 02 ,03 rather than EVD-1, 10, 11... 2, 20, 21, 22....3, 30, 31... etc.
The Quality Management selections control the Validations within Resources and Assets. A written process the team uses to validate an asset (HW or SW) would be a Resource which may also have an associated validation of its own from peer, legal, technical review. Assets would be tested and receive a current validation based on successful testing outcomes guided by a written procedure in Resources. The Resource SOP and any other hardware or software used as part of the testing would be recorded as being "Involved" in the validation, but they are not the subject of that particular testing evolution. The Asset that is the subject of the validation would receive a Pass, Fail as defined within this section.
Quality Management Status
Selector that enables or disables the utility for validations pertaining to Assets and Resources.
Strict Mode
With strict off, assets show “Not Valid” to inform the examiner the tool they are selecting doesn’t have a current validation associated to it when viewed in the edit modal of Assessments, Items and Exams in the “Connected HW or SW” fields. With Strict mode enabled the names of HW & SW do not appear in those lists for “Connected HW & SW” unless they have a current validation.
Validation Pass, Failure, Involved and Expired Labels
Allow editing of the terms displayed as associated to validation testing activities.
See the Validations section for more information on using this functionality.
Findings are a compilation of records within a case created as part of an investigation. The settings within this tab are used to customize ATLAS produced reporting within Findings.
Report Footer Case Number
The ability to display the current case number on every page of a pdf version of a case finding (comprehensive report) is defined by enabling or disabling the report footer case number selection.
Report Footer Number Orientation
If the footer case number display is enabled, the orientation may be defined as either horizontal at the lower left, or vertical at the lower right corner of every page within the pdf version of the case findings.
Case Cover
The first text editor in the report options section is used to design the pdf findings cover page. Any text and graphics can be placed within the editor to customize the cover page presentation. The case number and report date/time will be added by ATLAS during the production of the findings. The cover page only appears on the pdf version of the case findings if the "Enhanced PDF" selector.
Case Disclaimer
The second text editor labeled “Case Disclaimer” defines the content on the second page of the pdf findings. It is usually used as a confidentiality or document security statement. This statement is the first screen seen on the HTML version of a finding.
Case Footer
The Case Footer field allows users to customize the security statement at the bottom of the pages on the PDF version of the Findings. A default message appears in red text and reads “CONFIDENTIAL : Privileged Information” unless populated with user added content.
Case Admin and Technical Review
These two text editors are the method by which quality control review criteria are populated. These criteria may be viewed during the formal QA process built into ATLAS. When the primary (Leader) examiner believes all the work is completed within an investigation, the case is submitted for QA review by selecting the blue “Submit” button located near the upper right of the Case Page. The Submit button is replaced by an Approve button. After selecting the Approve button, the reviewer(s) can access the review criteria during that process by selecting a link labeled “View All Review Criteria.” The case is not “Approved” at that point unless the approver selects the Yes or No button to complete the QA review process. These two text editors in the settings utility are where those QA review criteria are defined.
Glossary
The last text editor in the report options section is for customizing the findings’ glossary. The glossary is selectable for inclusion while compiles the work in the Findings Builder. An example may be present within a new deployment, but it should be edited or replaced by the end users.
Users may define security settings for remote support access, domain restrictions, 2-factor authentication, brute force protection, Google reCaptcha, inactivity logout, active directory integration, chain of custody editing, read-only user index or full case access, contributor Quick Case search limiting, case access limiting by defining classified case tags. Each selection contains basic instructions for utilization.
Remote Support
Is a selector to enable or disable remote support by the ATLAS team at Magnet Forensics. Remote support may be enabled and disabled by the user to facilitate maintenance windows should support be isolated to the individual system. Remote support is only possible for systems deployed with external connectivity.
Restrict New User Domains
When enabled, a comma separated list of “Allowed” domains prevents users without those domains from creating new user accounts.
2 Factor Authentication (2FA)
May be enabled for use, and it applies only to examiner level users. Read-Only Limited users (submitters) are not required to use 2FA as they have little access to any information within the system. If enabled examiner level users can locate a QR code in their profile to setup their authentication app for use.
Brute Force Protection Selector
Enables or disables this utility
Google reCaptcha Selector
Enables and disables reCaptcha
Inactive Lockout
When enabled users can define the duration in minutes of inactivity before the user is automatically logged out by ATLAS.
Active Directory
When enabled a JSON template is displayed to assist in populating the AD JSON settings field utilized for AD integration.
Chain of Custody Modifications
Allows executive users the permission to edit individual chain of custody records when necessary. Executive users must open the individual item and select the edit button on that chain of custody to edit the record. To see the individual chain of custody on an item, which is required to utilize this editing feature, the setting on the Interface tab for "Chain of Custody Location" must be set to "Default." There is no ability to mass-edit chain of custody movements. It is suggested this feature remain disabled unless modifying a specific chain of custody for a legitimate reason. It is further suggested a Case note be made documenting the reason a modification to a CoC was necessary.
Access for Read-Only Limited users
Defines the default view allowed by those users as Index only (with or without Findings), or the ability to view the Case Page and anything within the case unless further restricted. Access to the full case is defined on a case-by-case basis by adding the read-only user to the Access List for the case in question. This selection in settings is the default to define if read-only users only see the index of cases they submitted, or if they can open and see the entire case for those cases for which they are on the Access List.
Access for Contributor users
Is the selector to define the access to content within the quick case finder viewable by Contributor level examiners. This regulates if contributors may see all the case names or only the names of their assigned cases within the quick case finder.
Access limiting with Classified Case Tags
Case tags can be used as classified tags to further limit case information. These “Classified Case Tags” limit the access to a case by only those listed as the Leader, or to those who are on the Access List for that case. This supersedes other default role-based permissions and requires users be affirmatively added in some capacity to view and edit the case. Highly sensitive cases may be examples where a “Classified Case Tag” is selected to limit access to a very small investigative pool of examiners. If this functionality is to be used, generic Case Tag taxonomies must be added first so they can be selected in Settings on the Security tab to act as classified tags
Access Allow Executive User Bypass
Is a continuation of the “Classified Case Tag” methodology, but it allows for a list of tags which does not apply to Executive level users. It would essentially allow Executives to bypass the access restrictions on the case which in practical terms would make the “Classified Tag” in question apply to all other users other than those in the Executives role. If a “Classified Tag” exists that is not also on the Executive Bypass list, only those users listed as leader or on the access list for that case will have access to that case regardless of their user role permissions.
A task manager is located near the top right of each case page. The task manager may be used to coordinate activities for examiners and investigators who have access to the case. A default list of tasks may be created for quickly loading common tasks into the task manager. This text editor is where the default list is created. Users enter the defined tasks in the new task field and select the “Add to List” button to populate the list. By clicking and holding a task, and dragging it up or down the list, users can position a task anywhere on the list. When list editing is complete the user selects the blue “Save List” and then green “Update” button. The order of the tasks may be changed on the case Task Manager in the same manner.
The primary components of managing the work within ATLAS follow the steps of creating a case, adding evidence, and examining the evidence. Once the case is created, examiners may find themselves primarily working with the two primary recording pages of the item page and examination page.
Within ATLAS an investigation, or engagement, is generically referred to as a case. There are two methods within ATLAS to create cases. If enabled, read-only users may be authorized to submit requests for services through a submission form. Using the submission form is an option that may be enabled/disabled in Settings > General Tab. The other method is to manually create cases by selecting the “New Case” button.
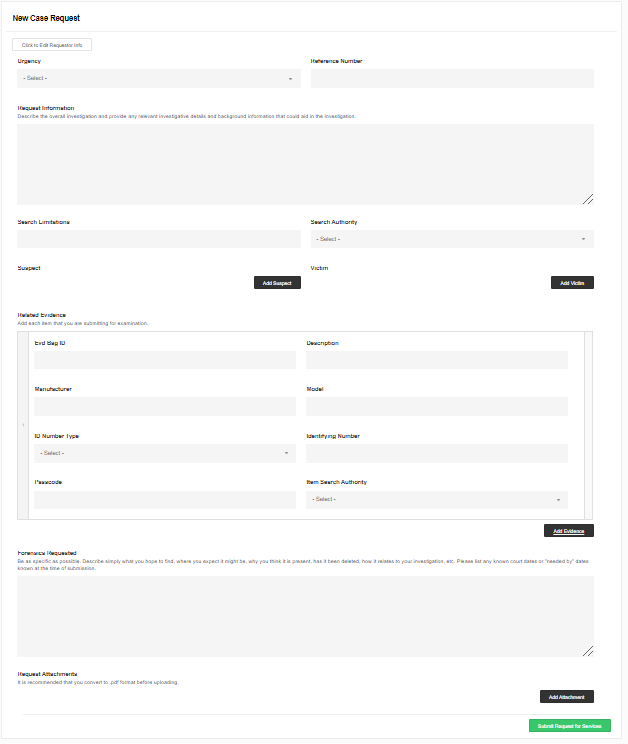
Read-only users have a button on their homepage to create requests for services. For access to the form as an elevated user, append /new-request to the URL to view the submission form. (example myurl.casedata.info/new-request). One or more attachments may be submitted with the request. The submitter adds evidence items to the form by selecting the “Add Evidence” button once for each item to display a field set to describe the evidence. Complete the fields and select the green “Submit Request for Services” button at the bottom of the page. An unassigned case will appear in the case index upon successful submission. See the section for Groups in Settings for automatic case routing.
Select the blue "New Case" button to create a new investigation from the Case Index.
Complete the fields on each tab to initiate a new investigation. The case name/number may be changed by overtyping the current one when necessary. Note: Executives have the ability to edit labels, hide, and/or require the fields. See the section for customizing field labels in Settings - Fields tab.
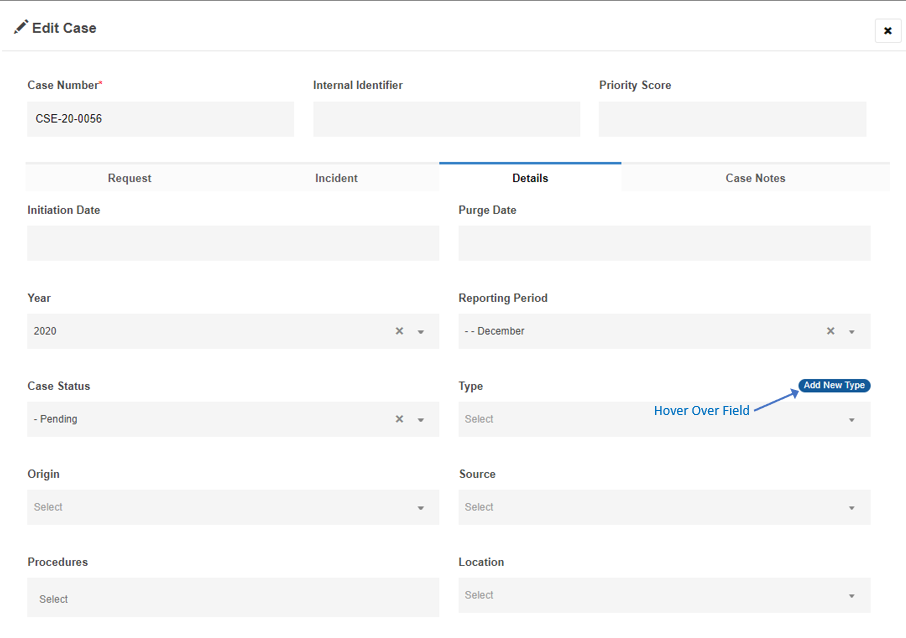
Dropdown lists that are also taxonomies may be edited on the fly by hovering over the top right corner of a field to add new terms. Visit the taxonomy manager, accessed from the footer, to edit or remove terms from the lists. The taxonomies become the filters by which the different indexes may be filtered. Below is an example of the taxonomies which populate the fields on the Case Edit page from which stats may be generated from the Case Index.
Case Number: can be created by default as defined in the settings utility accessed in the bottom footer. Alternatively, users may use any naming conventions for cases, as well as any of the records within the cases, by simply overtyping the field entries.
Internal Identifier is a secondary identifier option that may be enabled/disabled within the Settings>General Tab. The internal ID appears as a subtitle on the Case Page. It also appears to the far right on each case on the Case Index. When enabled it also appears on the printed Case Label.
Priority Scores are defined by users and entered on the Case Edit page. It allow users to view their Case Index ordered by their user defined priority scores. Priority Score is an option that may be enabled/disabled within the Settings>General Tab. Whether the priority score is displayed on the Case Page is also an sub-option in Settings>General tab.
The request tab relates exclusively to the requester of services. The Request Tab records the point of contact information for the requester and the details of the request. The Request Tab is what the submission form populates when creating a case by submission method.
Begin Date records when the original incident occurred.
Ending date of the incident is recorded when known.
Indent response timing tools record when the situation was identified, the difference between identified and the time to respond, difference between containment from response, and finally the difference between the resolution of the event from the response. These do not populate when not used for a case.
Incident Location is relative to the requestor’s point of view. This allows the users to differentiate between where the submitter is describing the incident happened verses the Case Location reported on the Details tab.
Offense provides a field to describe the actual offense description of code section(s) related to the request for services.
Suspect and Victim fields are, like other fields, renamable in Settings - Fields tab. These fields are used to relate the investigation to other involved people. These could be suspects and victims, subjects and witnesses, employee and supervisors etc.
The details tab records information from the lab team’s perspective. Information from the details tab is where many of the stats and metrics are derived from the case level.
Initiation date is the date used to compute average completion rates. Average completion rate is measured from the initiation date to the date the case is “Submitted” for QA approval after all the work has been completed within the case.
Purge Date creates an alert on the date selected within the Alerts tab on the home page.
Case Year is the year association for the immediate case and is a filter selection from the case index.
Reporting Period is the association for the case which defines the half year, quarter and month, and is a filter used from the case index usually in combination with case year to create time-based statistics.
Case Status is populated by a set of operational statuses within ATLAS. As an example, when a case is assigned to a case leader the status automatically changes to assigned. Similarly, when all the work is finished, and the casework is ready for a formal review, the submission for review changes the status to complete. When the review is done, and the case is formally approved, the status changes to reviewed. And when is finalized and closed, the status changes to closed. Users may add other cases statuses in addition to the operational ones. Users are prevented by the system from deleting the operational default statuses
Case Types are user defined taxonomies to categorize the classes of work they do. The lists of types may include primary and subtypes created in nested lists. These terms label the Case Page, but also create stats based on the terms when used as filters and shows as a metric on the home page related to all the case types for open status cases.
Origin generally describes the agency, organization or client requesting forensic services. For external requests the origin may simply be the name of that requesting agency, organization or client. For internal requests for services, origins may be precincts, shifts, bureaus or corporate departments. Origins are also filter selections from the Case Index and show on the Home Page as they relate to open status cases.
Case Procedures are used to generally describe, from a high level, the methods employed within cases. This is a multi-pick taxonomy to tag cases with terms for statistical reference.
Locations generally describe the jurisdiction or geographic region from where an investigation is requested. Location may be closely related to origin as well. As an example, there may be several agencies or clients (origins) who request services from the same jurisdiction or region (location). Location is a filter from the Case Index to focus stats, and a metric on the Home Page related to open status cases.
Case Tags are terms used to filter the Case Index to focus stats for any other terms not covered by the other taxonomies. These tags could be used to assist in focusing investigation stats related to available funding. As an example generic Case tags could be used by LE users to filter cases involving opioid overdoses as well as those involving deaths. The case type may be a narcotics investigation, but the generic tags allow the user to filter for just those narcotics cases involving OD’s and even OD’s where there was loss of life. Corporate users may use the Case Tags to aggregate stats for financial losses incurred as part of an incident response investigation. Generic tags could be used to create stats for cases having losses of less than $50k and losses greater than $50k as examples.
External Finding Expiration, when selected, defines the expiry for findings availability on a read-only user’s index.
The case notes tab can be accessed to edit, reorder, or remove case notes when necessary. However, it is more efficient to add new case notes from the bottom of the case page view.
See the Case Notes section in this guide for more details.
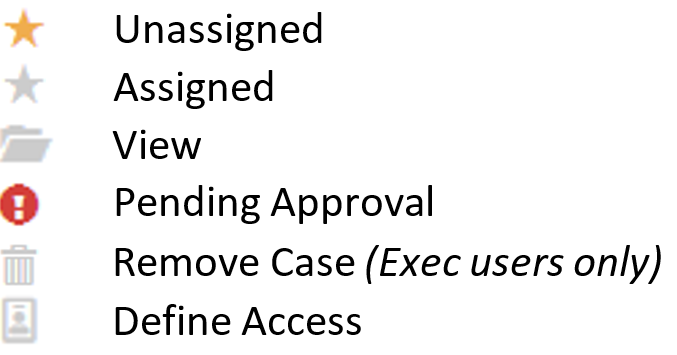
The workflow for distributing casework in ATLAS depends on individual usage, but generally follows the same order. If the system is enabled for remote submissions, and the case request was initiated by receiving the submission form from a read-only user, the case index displays three adjacent buttons at the right of the case information. The white left button allows for the review of the submission form contents. The blue center button accepts the case and logs the case with an associated accepted date and time which can be used to sort the list for viewing. The orange button with a star is the case assignment button. If a case is made without an external submission there is no blue button present.
After selecting the blue “Accept Case” button, select the “Assign Case” button or click the case title to open the individual case page. Case assignments may be made from the case index or may be made on the individual case page. Begin typing the leader’s name and ATLAS will suggest usernames based on text progression. Click the name of the leader and select the blue “Update Leaders” button and the case status will change to “Assigned.” Select the “Notify Leader” button to send an email notification to the leader about their new case assignment (if ATLAS is deployed allowing email notifications).
The example below is assigning a case from the index.
There are icons with numbers adjacent to the other icons when viewing cases on the Case Index. When the request form is used for a case the number on the left indicates the number of evidence items entered on the request form at the time of submission. The number on the right indicates the number of current evidence items entered within the case. If the number of items on the submission form is greater than the number of items in the case users will notice the orange coloration of the number on the left. Once the number of received items is equal to or greater than the number of expected items from the form, both numbers appear gray in color.

Using the “Access” button gives access on a case-by-case basis to read-only and contributor level users. This is how users are assigned access and listed on the dissemination list on the case view page. Executive users determine the extent of access granted to read-only users in Settings>Security. Read-only users may be granted full case access or index only access depending on the option selected in settings. The “Dissemination” label may be edited by an executive user within Settings>Fields.
The utility of "Restricting Access" can also work in the opposite direction when it applied to other records within the case. Every record has its own access list. If a list is created, and if the read-only user who has access to the case is not placed on that individual record list, then the access list has actually been used to prevent the user from seeing the record. This could be used to prevent a read-only or contributor level user from accessing certain records within a case to which they otherwise have access. This type of access granting/denying relies on the default role permissions for each named user.
Access limiting with Classified Case Tags: Case tags can be used as classified tags to further limit case information. These “Classified Case Tags” limit the access to a case by only those listed as the Leader, or to those who are on the Access List for that case. This supersedes other default role-based permissions and requires users be affirmatively added in some capacity to view and edit the case. Highly sensitive cases may be examples where a “Classified Case Tag” is selected to limit access to a very small investigative pool of examiners. If this functionality is to be used, generic Case Tag taxonomies must be added first so they can be selected in Settings on the Security tab to act as classified tags.
Adding evidence items to a case is often one of the next events following case creation. Complete documentation of chain of custody is a critical component to ensuring the proper foundation is laid for admissibility. Beginning on the case page, Items may be added by two methods.
The quick entry method allows users to create and edit new items directly from the case page without navigating away. Select the blue "Add Item" button to create and edit a new evidence item. Chain of custody movements are made after item creation and can include all or a sub-set of the evidence items within a case.
Bulk or multi-entry allows for the rapid creation of any number of blank items at once. The items can be numbered sequentially or non-sequentially. The items can then be edited directly from the case page by using the quick editing function by selecting the pencil icon on each item. Chain of custody movements are made after the item creation entries in this methodology and can include all or a sub-set of the evidence items within a case.
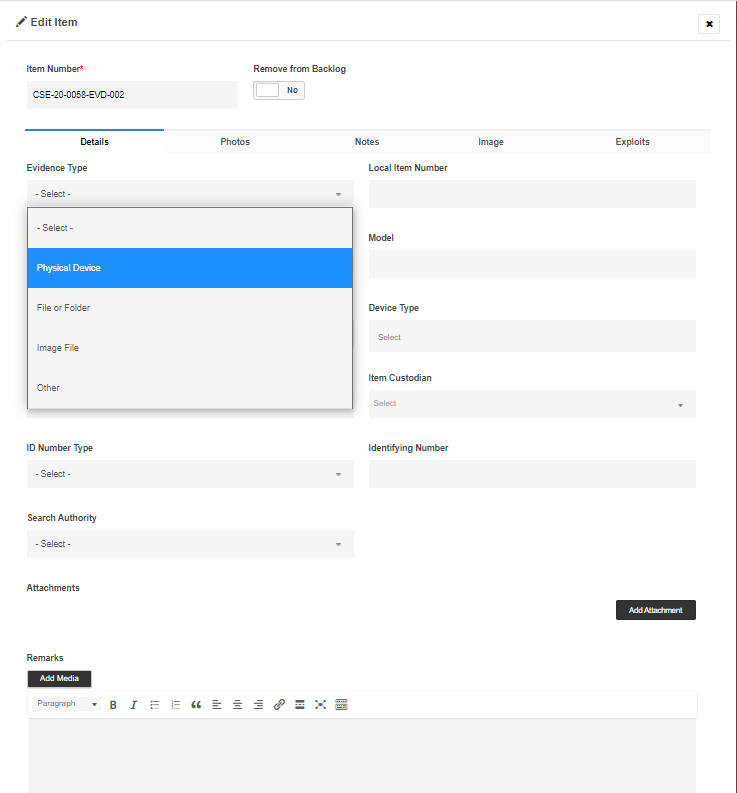
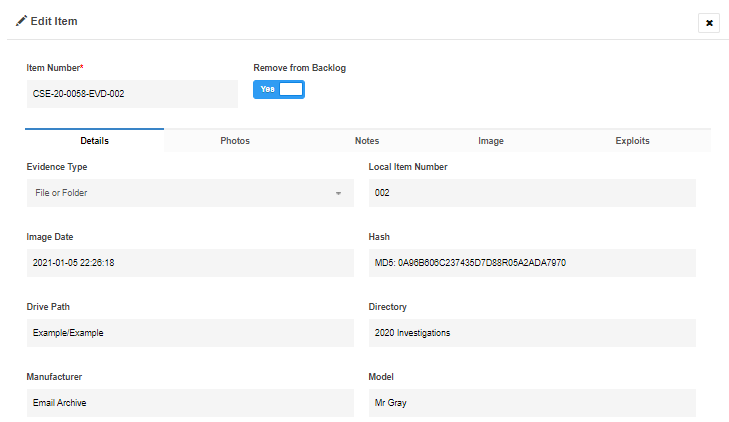
The Item fields on the Item Details tab are presented based on the evidence type received and entered into ATLAS. Selections for evidence type available are Physical Device, File or Folder, Image File and Other. Number types and associated number fields are available to properly describe evidence at intake along with remarks for additional descriptions such as condition of the item.
There are some instances in which an item was collected, but no examination will be completed. Users may toggle the selector to exclude the current item from appearing in the backlog chart on the home page. Email in a eDiscovery request could be an example of evidence collected with no exam required.
The identifying number fields on the item details tab conduct a duplicate entry search of the system after the field is populated and the user moves off of the immediate field to the next. If there is a duplicate entry detected a link to the duplicate(s) will appear above the upper right corner of the duplicated identifying number field in question. As an example, if phone numbers for mobiles are listed as one of the identifying numbers, users would be alerted of a duplicate entry even if the actual device make and model had been replaced by the owner over time.

Photos can be added on the Photos tab. Select the add to gallery button to select or drag and drop photos into the photos utility for the current item.
After selecting images for upload, or dragging and dropping them into the utility the blue “Select” button in the lower right corner will become active. Select this button to include the selected photos into the current item.
The photos may be re-ordered by clicking/holding and dragging them into the preferred order. The full photo displays on the Item page view.
Descriptions may be added to photos by clicking on the thumbnail image on the edit page and inserting text in the description field. The description appears on the page view directly below the photo.
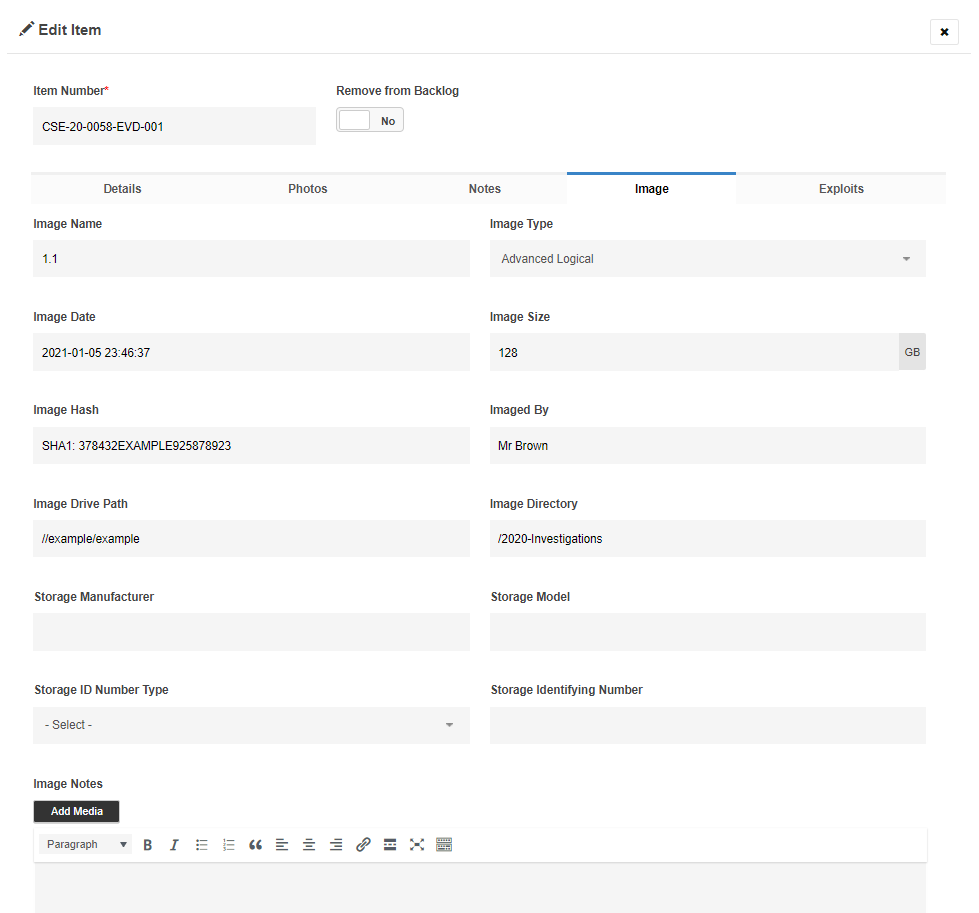
Results from imaging are entered on the image tab. One or more image descriptions may be added which only appear on the item page when populated. The Image Hash field triggers the display of this information on the Item Page View. Additional image descriptions are created by selecting the black Add Image button at the lower right of the screen.
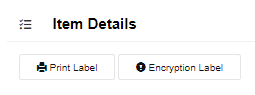
Label printing for evidence items is available from the individual item pages. The label prints to any locally installed label printer. A QR code on the label may be used for inventory control if scanned with a 2D scanner to produce a “Scanner file” for comparison in the Audits section in ATLAS.
Chain of custody entries are completed by using the movement function on the case page in the evidence section.
After selecting the Movement button, the user selects the items subject to the movement. The “All” button may be clicked to select all the evidence intended for movement. Items may be individually selected or deselected by clicking them from inside the movement modal.
After selecting the items to be moved in the modal, select the “Next” button to open the movement screen. Complete the appropriate fields to create chain of custody movements and complete the movement by selecting the green “Add Movement” button. By using the “Object” field, movements may be created to describe transfers of the tangible items, or to describe the movements of the digital evidence within the casework by selecting image as the object. This method creates an end to end evidence log, as well as the entries needed to do evidence inventory control for devices and/or data from the evidence index.
The combined chain of custody, or evidence log, may be viewed by selecting the “Log” button in the evidence section on the individual case page.
The total evidence item count of items in the immediate investigation appears in a grey circle beside the Evidence section label whereas number of items subject to a move appears in a blue circle when the movement modal is open and items are selected for movements.
To view the items in the immediate investigation as an inventory select the “Explore” button in the evidence section. From that view users may see the items in the current case in a table view which may be exported as a csv file if necessary.
The Item page is the property sheet used to describe what is the subject or focus of an examination. The Examination is the accompanying worksheet used to document all the examiner’s work, processes, notes, and analysis done during the examination phase. To begin an examination, navigate to the item within a case that is the immediate focus. Open that specific item and select the blue “Add Exam” button to open the examination worksheet for that item.
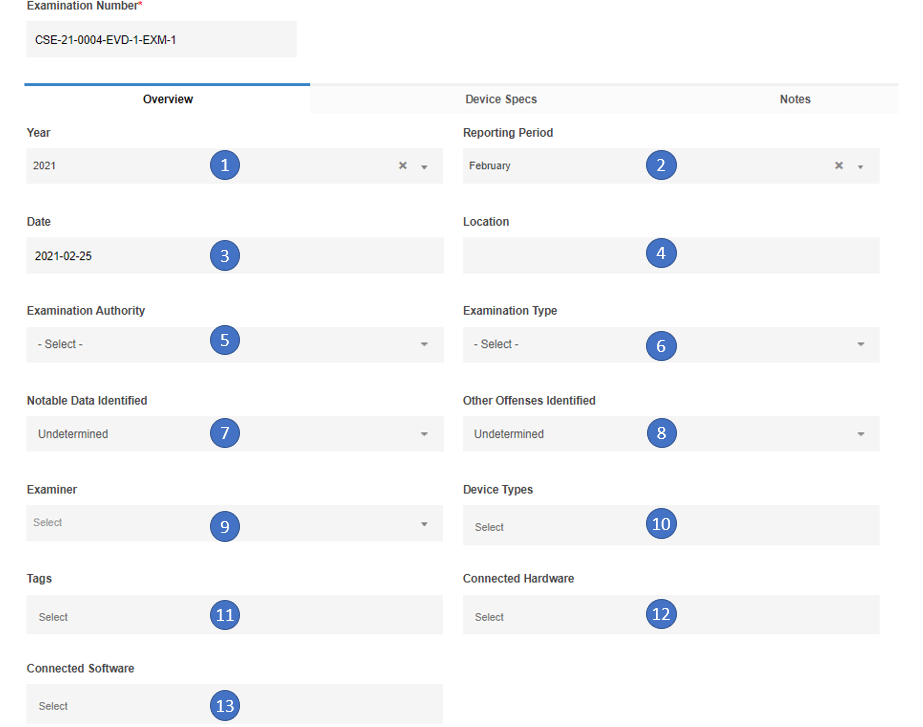
Complete the initial entries to begin an exam.
The fields on the device specifications tab are presented based on the selection of examination “type” on the overview tab and are generally self-explanatory. The fields on the device specifications tab are further defined and presented based on the field entries while editing the form. As an example, if internal storage is included while selecting capabilities, the examiner is presented with a field for the device internal storage capacity which also populates a report field and creates statistical examination data.
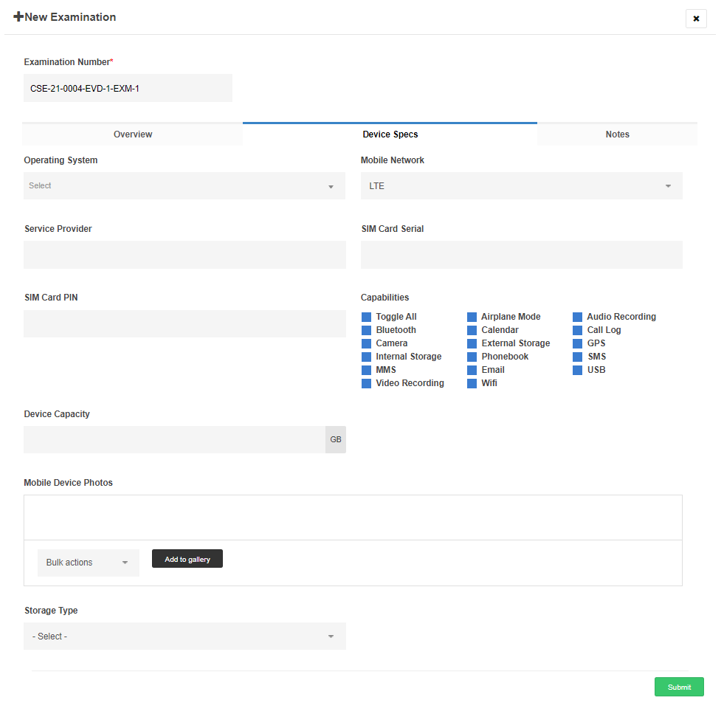
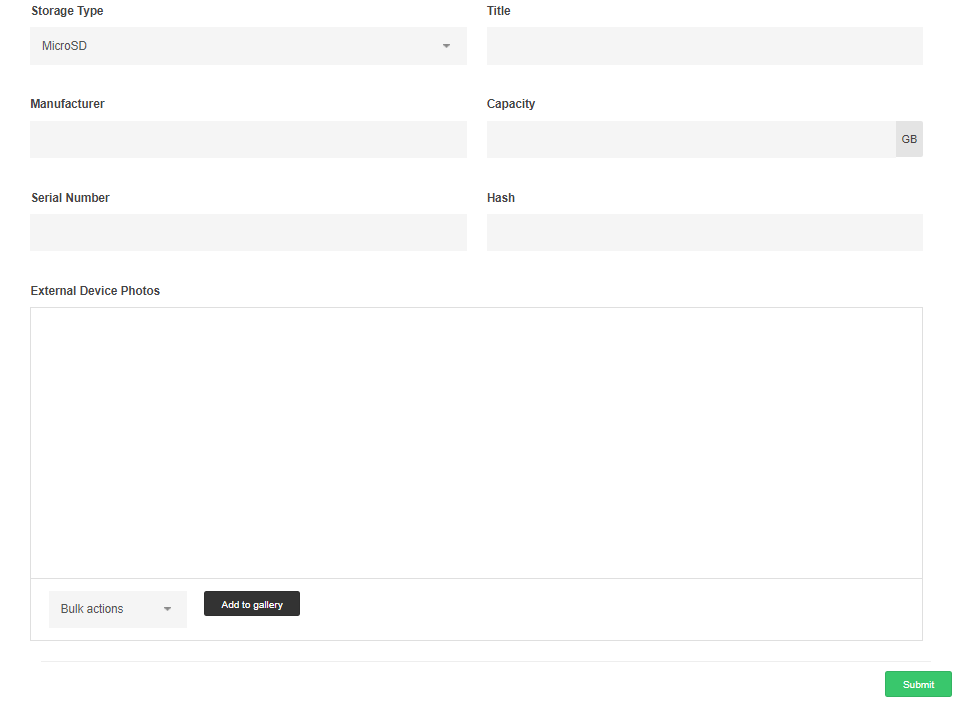
ATLAS can handle derivative evidence by describing additional storage as sub-items on the specifications tab dependent on the examination type previously chosen. Near the bottom of the page on the device specifications tab there will be fields to populate other storage such as microSD in the case of a mobile exam, or internal drive storage in the case of a PC exam. There is a selection for “None” as a sub-item storage type for those who wish to indicate the device is capable of having external storage, i.e. MicoSD, but none is installed. Alternatively, the examiner may create subsequent items in lieu of describing them as sub-items.
Notes may be edited from the examination edit modal, but are more efficiently added from the examination page view. To navigate to the examination page view, first save or update the edit examination page and then select the “View” button or the “view examination” link.
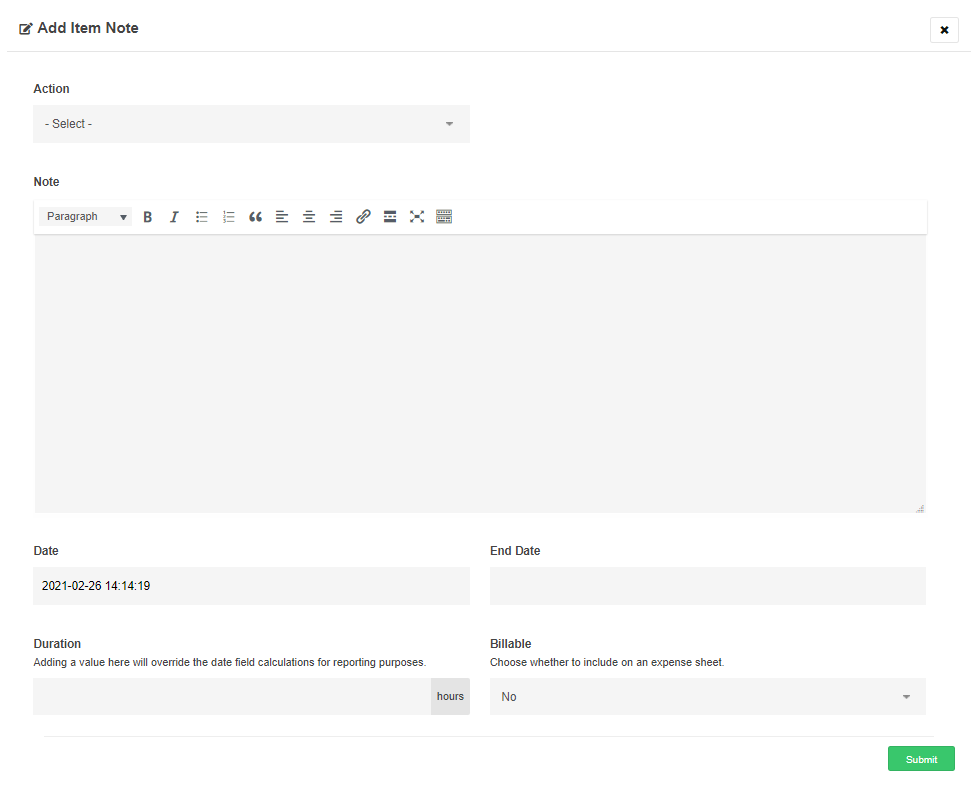
Select the “Add Note” near the lower right of the examination page to open the text editor for adding contemporaneous notes. The “Action” field is a brief description of the purpose or intent of the note. The terms in the action field are defined in Settings>Fields and are what is used when filtering for Activity statistics on the case page or home page.
The text field for the note may be expanded by dragging the lower right corner to a nearly full-page view for easier editing. Screenshots need to be saved as an image first and then added to the notes as media. From there it may be positioned and appropriately sized to suit the writer. Text may be directly copied and pasted into any of the text editors, including the notes modals.
The text of the note may be styled by using any of the formatting tools available in the text editor. ATLAS automatically logs the date, time and user creating the note.
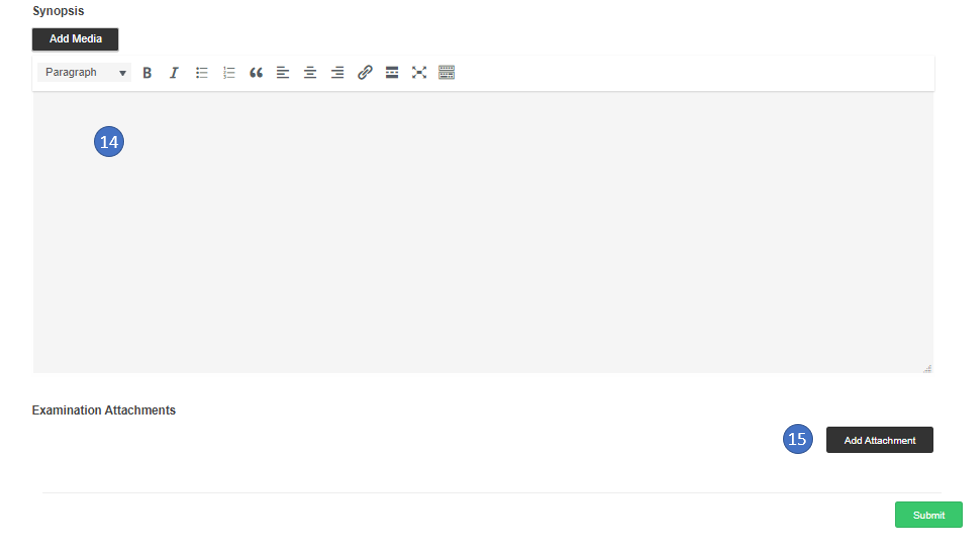
After the examination forensic processes are completed, the exam synopsis is generally a good location to summarize the notes for the immediate exam. This workflow may be continued by summarizing all the examination synopsizes within the current investigation into an executive summary on the case page.
The case page is the central location for every record created within an investigation. The item and examination pages are used to document much of the information within a case. There are a few other record types available to the investigation in the Records section near the center of the case page.
The activity tab on a case displays similar information as does the activities tab on the home page except the metrics are for a single case. In addition to displaying the activity stats for the case, the timeline view on the case page presents a chronological history of all notes entered on any of the records within the current case. By default the Chart and Summary views are selected and display within the Activity tab. Users select the "Views" selector to select or deselect the Chart, Details, Summary, Timeline, and Totals views. Users select filters to limit the notes that appear within the timeline, or any of the other stats in this section. After applying the selected filters and creating a focused list of notes, the current timeline view may be exported directly as a PDF document for convenience. The primary difference between the single case activity tab and the activity tab on the home page is the home page activities can aggregate statistics for activities over more than one case.
The “Activity Feed” is a dynamic chart that users may filter to focus the feed more closely. The filters allow users to filter by time periods, by users on the case, by source records types, and by the actions. These are multi-select filters which can be chosen in any combination to present the information topically and quantitatively as needed.
After selecting the desired "Views," and after the filters are applied, users can view and copy the chart for use in external presentations. They can view tables comprised of the filtered activity data and export those tables. These data analysis steps also apply across cases on the Home Page to get system wide activity stats.
See the Home page Activity Tab section for more information relating to filtering statistics related to activities.
The assessment record is used to screen potential evidence. Examples of uses may include rapidly documenting numerous potential evidence items at the scene of a search and recording the decision of whether the screened evidence is probative and within the scope of the search for seizure, or non-probative and should be excluded. A corporate investigator may have a similar scenario at a custodian’s workstation. The form is very simple with self-explanatory fields and repeatable sections to quickly record any number of potential evidence items.
This is one of the work phases in ATLAS that could utilize lab assets. See the Assets section of this guide for more information related to usage history for assets. Statistics are produced from the assessment records including the counts and capacities of data seized, excluded, or referred depending on how the activity was recorded.
A property receipt for the items taken as part of the Assessment may be generated by selecting the Receipt button located in the top row of buttons on the page.
Assessment Items may be added as Evidence Items to the case by selecting the “Add to Case” button to the right of each item listed on the Assessment.
The Document record is used to create time-based alerts for a case. The summary text area on the Document allows users to relate the context of the alert. The Document has only a few fields, but the primary ones are the text area for the content, and the reminder date field that controls the alert. Examples of uses may be when information is owed to, or from, the investigation team by a certain date. Any of this content could be listed in the document summary and when the reminder date is reached it creates an alert on the Alerts tab on the homepage. To remove the alert from the homepage, the user edits the reminder date forward to a new date, or removes it from the document if the requirement was met.
The report may be used much like a memo to file. Reports are used to record other investigative events that are not usually recorded on an examination. Meeting notes, interviews, background information, the planning and execution of a search warrant, the scoping requirements for eDiscovery collections, or any other information that doesn’t seem to go anywhere else in the case are all examples of what a Report may be used for in an investigation. Reports also can be used to record time spent doing other investigative activities that are not recorded on an examination. Because users have the ability to create “types” of Reports, users get statistical results for how many of their defined types of events the had and the time spent doing each type when these fields are used.
The Request Tab displays the initial point of contact for the immediate investigation. If the case is created from the submission form, this area is pre-populated from the profile of the read-only user submitting the request, along with the request information. If the case was created manually without a submission, then the request fields were manually populated to display in this area.
Evidence items listed on the Request form may be used to create Items in the case by selecting the “Add to Case” button to the right of each item listed on the Request.
Expense reports on a case may be used to record actual expenditures and/or rates an hours for billable expenses for the immediate investigation. The expense report is described in more detail in the Financial section of this guide. It is a simple form to create a receipt on the case level for expenditures or billables that may be later elevated to invoicing and accounts. See the Financial section for more detail.
Line items on expense reports may also be created from notes when the Enhanced Notes option is enabled in Settings>General tab.
The Statistics tab on a Case page aggregates stats from within that single investigation. The breakdown is the same as statistics displayed by filtering the Case Index except these stats relate solely to the immediate investigation.
Findings are a compilation of the records users create within an ATLAS case. Users create Findings by selecting the blue “Add Findings” button near the right edge of the Findings section. Users define a name for the findings, select the content to include in the immediate iteration, and then customize the visible content by using the show/hide and redact buttons at the top of each section. The distribution methods are at the top right of the Findings Builder. For more information see the Findings Builder section later in this guide.
Attachments may be included on most of the records within an investigation. If they are included anywhere within an investigation, they also populate on the Case Page as a table of attachments. The attachments table can also be shared with read-only users the same way Findings may be on those users' Case Index. One of the benefits to using the attachments within ATLAS is the ability to share that information in a manner that comes with the ability to audit who has accessed the attachments, when, and from where. Enabling attachment sharing is an option in Settings on the General tab. Executive users may delete attachments from the table when necessary.
Case notes are generally more global in nature to the immediate investigation. Uses may choose to make notations relating to administrative tasks within the investigation, phone calls and emails, or other inquiries about the immediate investigation. Case notes are a good place for supervisory type notes when reviewing an ongoing investigation. There is the ability to include or exclude these notes on Findings should the content of the notes be privileged based on the intended reader(s). Case note activities are also sources for data measured within the Activity Feeds on both the Case and Home pages.
The task manager is used to as a case level lead task manager to coordinate activities among collaborating examiners and to avoid duplicating efforts. It may be used to individually assign specific tasks to individual examiners when working as a team on a single investigation. A default task list may be created on the Tasks tab in Settings. The default list can be added to the case task manager and used as a checklist by selecting the default task button. When populated on a case, the default list can be re-ordered and have terms deleted without effecting the next time the default list is selected on a subsequent case. These two methods may also be used in concert. Individual tasks may be used in addition to the default list.
Completing the tasks by checking them off in the list is what causes the progression of the progress bar when it is saved. The progress bar may be viewed at the case level, on the Case Index for upper credentialed users, and on the Case Index for read-only investigators who submit requests for services. The read-only users do not see the tasks that make up the progress bar without being granted full access to the case.
The primary purpose for the Task Manager was to help with task deconfliction, and to give a general sense of progression of the investigation. For supervisors of investigations the Timeline view within the Activity tab may provide a much more detailed sense of status of work by presenting the notes taken within the current investigation in chronological order.
Above the case details on the case page there is a Case Label button. This label can be printed to any locally installed label printer. The label contains basic case identifying information for use in consistency in packaging or labeling paper deliverables. The end users have the option of using the Internal Identifier by selecting or deselecting the "Secondary Case Identifier" on the General tab in Settings. The Internal ID shows on the Case Page and Case Labels only when that option is enabled.
Every page in ATLAS has an access log which is viewable by executive and manager level users. Visits to every page are logged by user, time/date, IP and indicate whether a page was viewed or edited, including button selections made on those pages. The access logs are exportable for Excel and .csv files if needed for investigation externally. Executive users may also view combined system logs by selecting the Tools button in the page footer which include both page related events as well as system related events including successful and failed log in attempts and password changes.
The basic workflow for ATLAS is very simple.
The case can be likened to a work folder which contains all the investigative actions. Likewise, the item within a case can be considered the “property sheet” to enable users the ability to begin the process of collection and storage for chain of custody purposes. Lastly, the examination record should be considered the worksheet that examiners use to record all their contemporaneous notes about the processes they are performing. The examination is linked to the item from which it was created, and both are within their related case.
Asset usage and financial activities can also be linked to the casework, and provide additional stats and metrics when utilized.
As described in the form descriptions preceding the workflow section, once a case is created, the submission request is reviewed and accepted, the case is assigned to a case leader, and the investigation is recorded within the immediate case. When all the work is completed within a case, the leader will submit the case for QA review by selecting the blue "Submit" button near the upper right of the Case page. QA reviewers, even if a self-review, approve the subdocuments within a case (ie: items, exams, documents, reports, expense reports, invoices) and then the case can be approved. Findings are a compilation of the records completed, and usually approved, prepared for distribution to the appropriate stakeholders.
Creating contemporaneous notations is an important part of fully documenting an investigation. Case notes, Item notes and Examination notes are the three places most notes will be generated. The note modals are found at the bottom of those pages.
Notes on the Case Page are generally more global in nature relating broadly to the entire investigation such as inquiries, phone calls, supervisor reviews, progress evaluations and the like. These are recorded on the case page because they usually do not pertain to only one individual item or exam. If so, the note would be made on those records instead of the Case Page. There is the ability to include or exclude these notes on Findings should the content of the notes be privileged based on the intended reader(s). Case note activities are also sources for data measured within the Activity Feeds on both the Case and Home pages.
Notes on an Item page are usually relevant to condition of the object or something noteworthy about the intent, requirement, and process for collecting an item. Because the Item represents the property sheet to enable collection and chain of custody, notes at the Item level usually have something to do with the property or the intended acquisition of it. Like other notes, item note activities are also sources for data measured within the Activity Feeds on both the Case and Home pages.
Notes on an Examination page are the examiner’s bench notes. These are the contemporaneous record of the forensic processes being conducted and can be very descriptive of the progress being made toward the requested services or goals of the investigation. Like other notes, exam note activities are also sources for data measured within the Activity Feeds on both the Case and Home pages.
Using any of the Note Modals. The Note Modals open as large text areas. Text may be copied into the text area. Graphics and screen captures are added as Media by uploading the graphic file and formatting size and location within the modals. The “Note Actions” are edited on the Fields tab in Settings for each of the note types. These actions are what become the topics for which activities are grouped within the Activity section on individual cases and are aggregated across the system on the Home page Activity Tab.
When enabled on the General tab in Settings, the “Enhanced Notes” provide a method of also collecting duration and billable durations for note activities. These durations indicate the amount of time spent per action within a note. Billable duration is also calculated based on how the notes are completed.
Regardless of where a note is created within a case, they can be viewed on the Activity tab in the Records section located mid-page on a case. As actions and time are being accounted for within the notes, users can see the information visualized in several ways.
The “Activity Feed” is a dynamic chart that users may filter to focus the feed more closely. The filters allow users to filter by time periods, by users on the case, by source record types, and by the actions. These are multi-select filters which can be chosen in any combination to present the information topically and quantitatively as needed.
Once the filters are applied, users can view and copy the chart for use in external presentations. They can view tables comprised of the filtered activity data and export those tables. Users can also review the information as a timeline from which the activity times are derived. These data analysis steps also apply across cases on the Home Page to get system wide activity stats.
See the statistics section for more charting and metrics details.
A formal QA review process is built into ATLAS. The formal QA review process begins when the casework is completed by the digital investigators. The executive summary is probably one of the last things that may be added to the case page before submitting the work for formal QA review. No matter if the QA review includes supervisor, legal, technical, or self-review, the process is the same.
Near the top right of the case page there is a blue “Submit” button. The case leader submits the case for QA review and is provided a modal to notify the intended reviewer(s) as well as the investigating read-only submitter the case is ready for the approval process. The case status changes to “Complete” when submitted for formal review meaning all the intended work has been completed. Depending on the user’s protocol, the review could be a self-review, or include any combination of peer, legal and technical reviewers. The reviewer(s) logs into ATLAS to review and approve each sub-record within the investigation before approving the case if the criteria are met. The case review criteria are created on the Reports tab in Settings.
The status of the case changes to “Reviewed” when the case is approved meaning everything within the case has been reviewed by someone. This is generally the time the findings builder is used to compile the information into Findings.
When a case is submitted for formal QA review, additional logging occurs within the case audit utility. Submitting the case for QA review creates a db snapshot and hash of the case at submission. When the case is approved another snapshot and hash are recorded. The case compliance audit utility allows users to see any differences in the case from the time it was submitted to the current moment it is being viewed, any differences from the time it was submitted until it is approved, and from the time it was approved to any time the case is being viewed after approval. This methodology helps to meet record transparency requirement as it displays the changes in the records between those notable states of the case. Findings and system logs may also serve to backup record authenticity inquiries.
Findings are a compilation of the records users create within an ATLAS case. Users create Findings by selecting the blue “Add Findings” button on the Case page. Both the PDF and HTML versions have interactive links to attachments when distributed. Users produce Findings by proceeding through the following workflow:
Customize the contents of the Finding:
Select HTML and/or PDF format(s) which will be created and attached to the case. If the PDF is selected there are three additional selections that apply.
The “Add Findings” button also allows users to "Upload Custom Findings” they have externally created as PDFs or HTML formatted files.
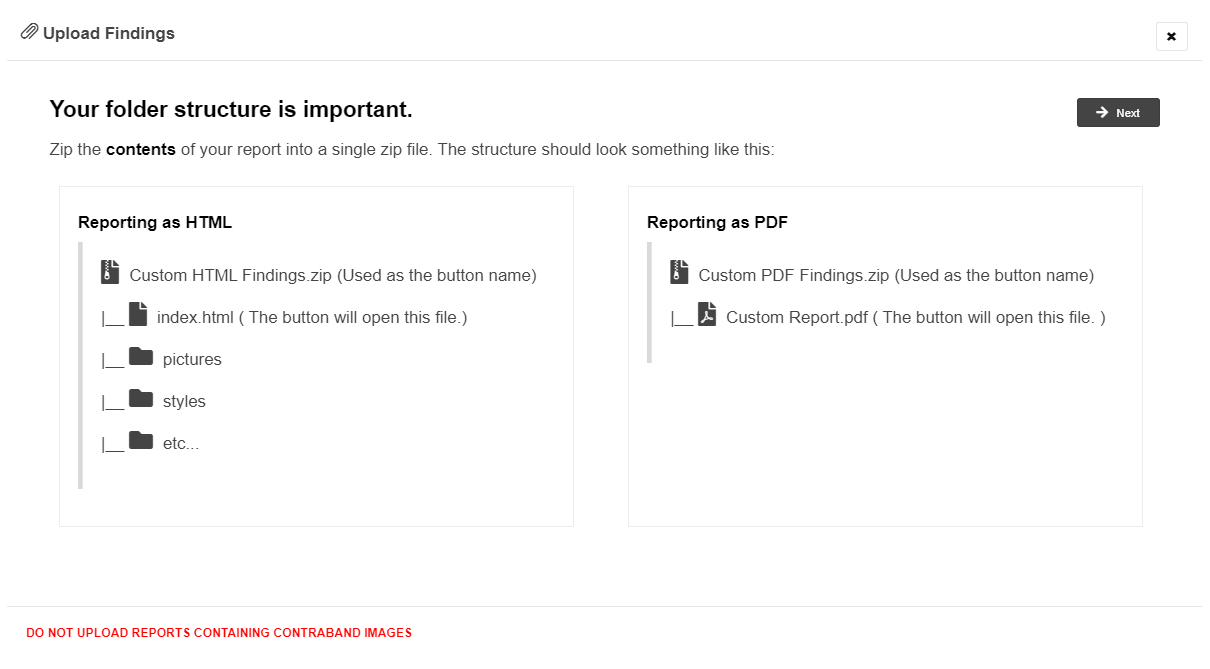
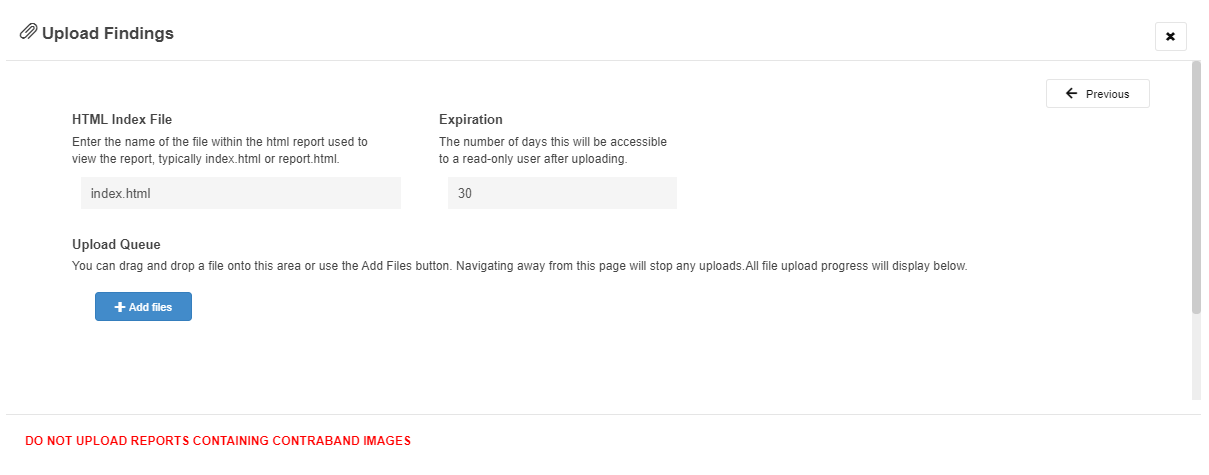
The two primary functions of Assets in ATLAS are to allow the user to describe the tools they use during their work phases and to facilitate the management and tracking of those assets. Assets are recorded on case work by selecting assets within the “Connected Hardware” and “Connected Software” fields while editing the Items, Examination and Assessment pages. At a minimum, creating hardware and software assets by name allows the user to link these assets during casework to list the forensic tools on the pages used to document the work. This also creates usage history entries for the assets along with asset usage statistics. Used to its fullest, the assets section can also manage the existence, inventory, assignments history, and financial information related to these tools. By utilizing the assignment utility for assets, inventory control can be accomplished by filtering by several criteria including assignees and teams. Like evidence items, label printing for assets is also available.
Multiple asset selections may be linked during work activities. From the assets themselves, you may link the assets to an account in the same way. Linking the assets to an account updates the account with any expenditures incurred during the acquisition of the assets, reoccurring costs, or service costs for those assets.
Navigate to the hardware assets from the top menu bar.
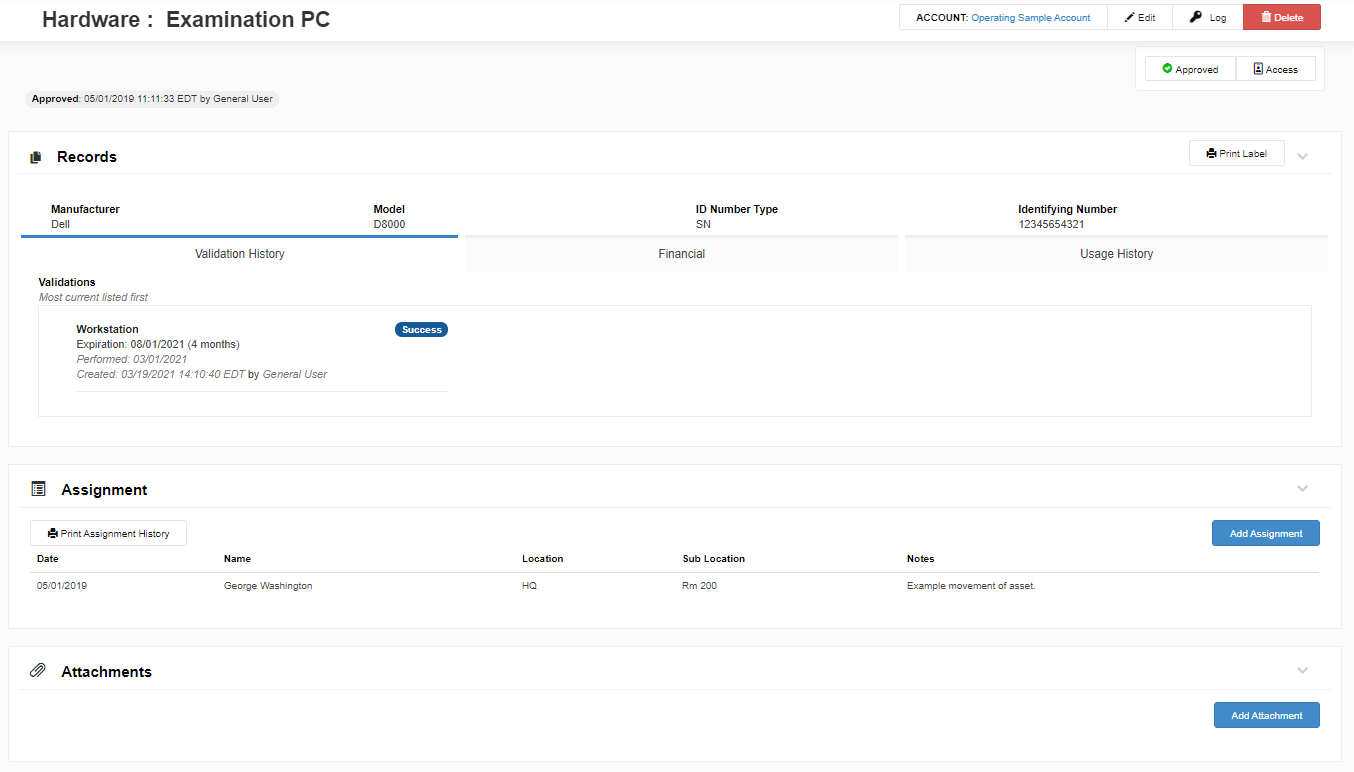
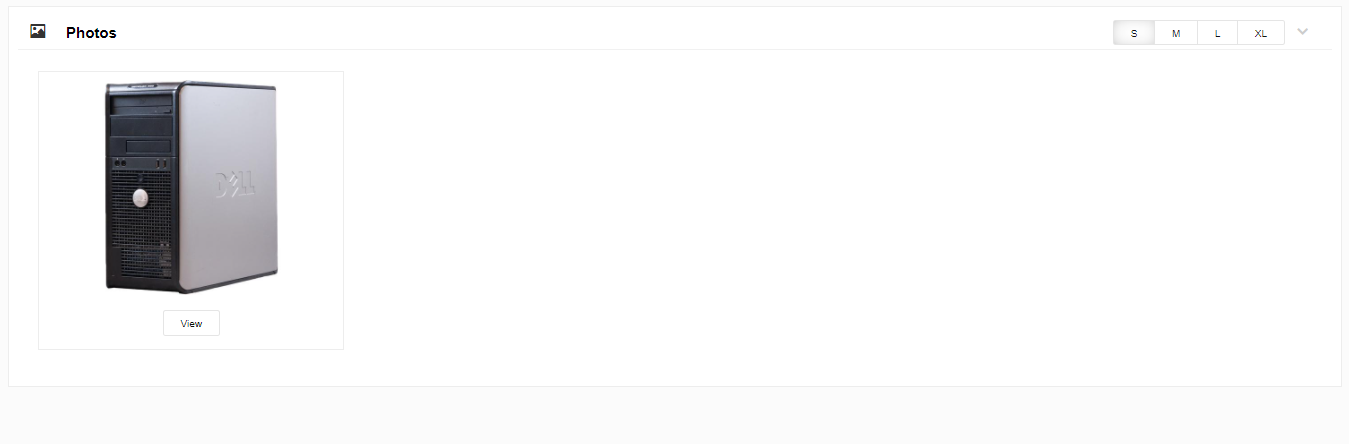
Create hardware assets by selecting the blue “New hardware” button located on the Hardware Index.
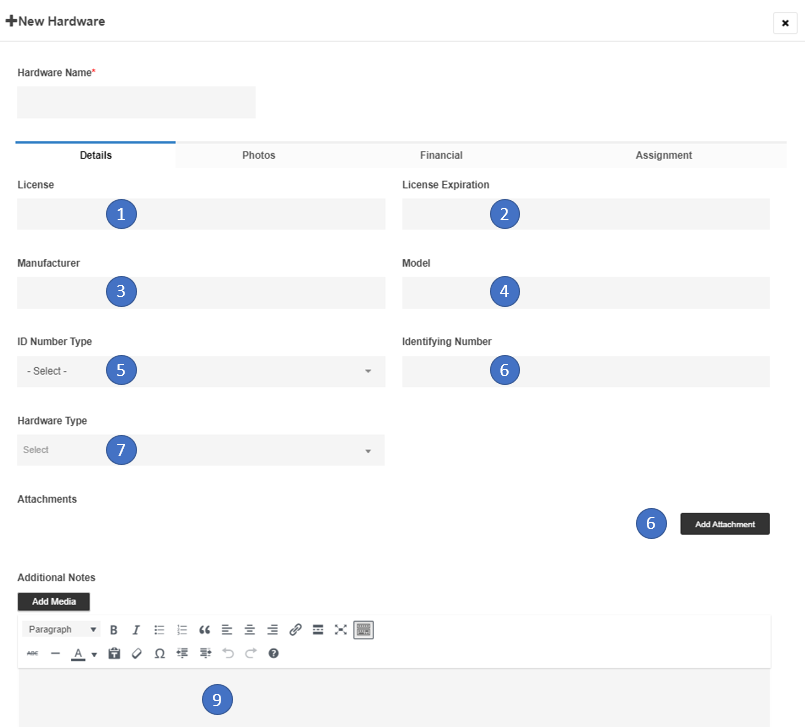
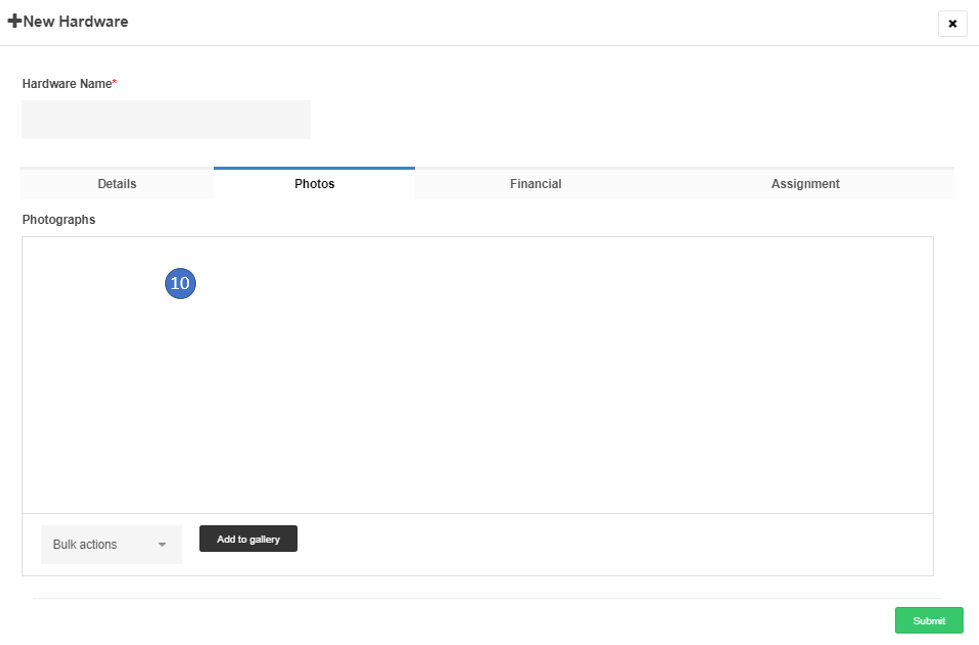
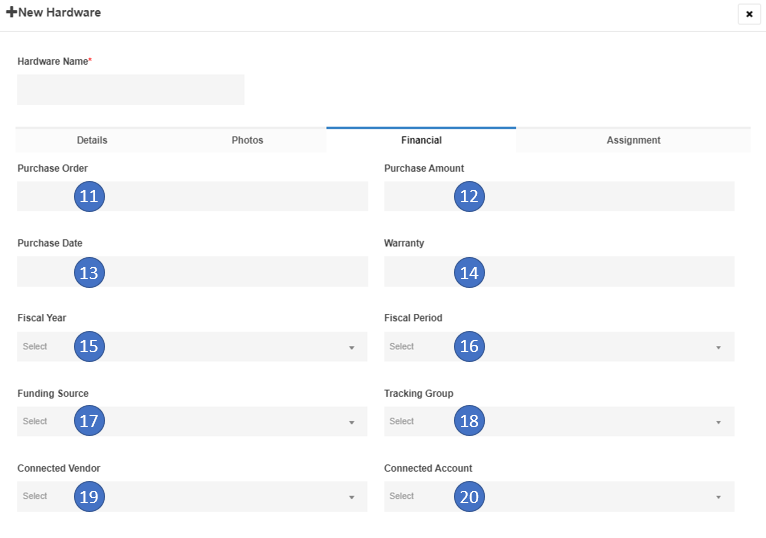
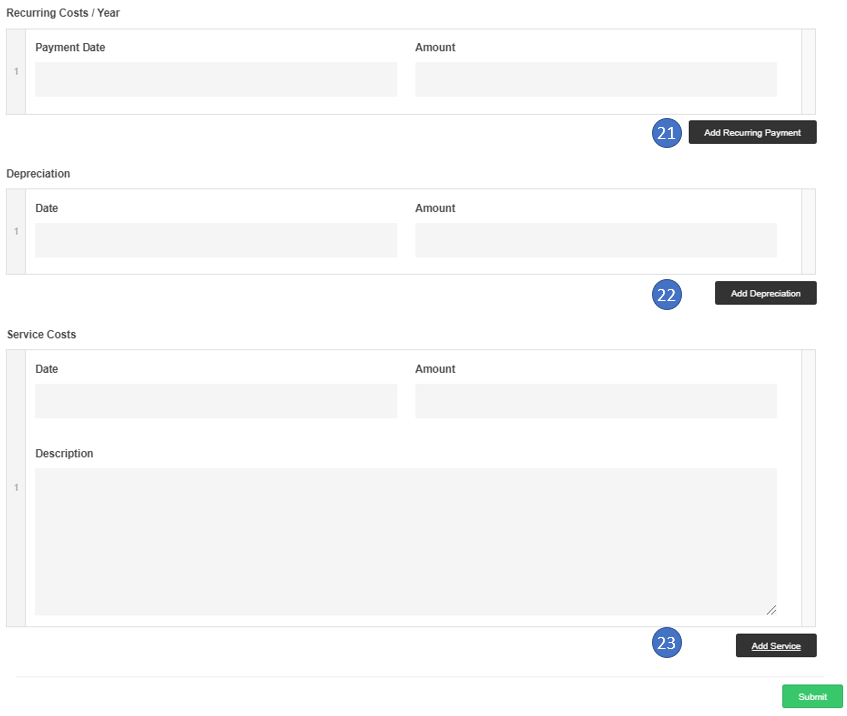
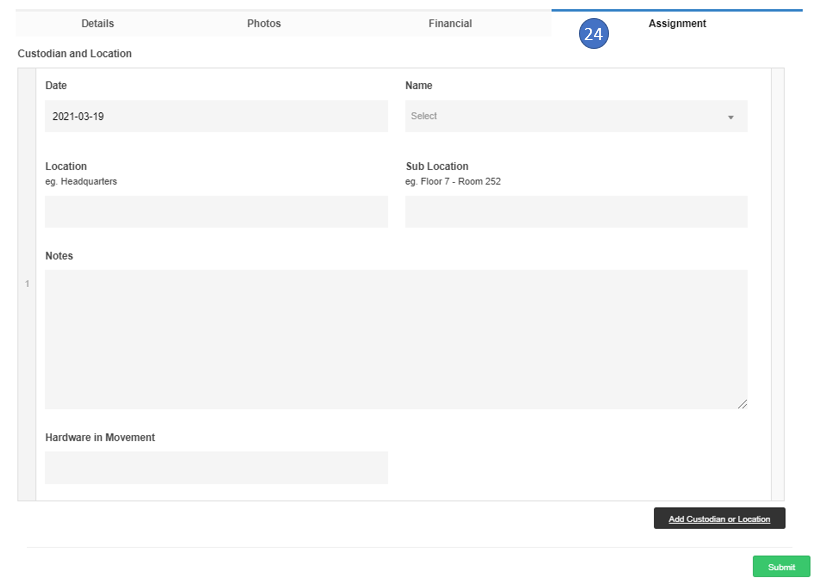
Complete the fields on the Add New Hardware page. Many of the fields are self-explanatory.
The Hardware Name is the short version users choose when doing casework. This name is displayed on Assessments, Items and Exams, as well as within Equipment Stats when selected so a short version is recommended for these purposes. Longer descriptions can be entered in the following fields.
Create software assets by selecting the blue “New software” button located on the Software Index.
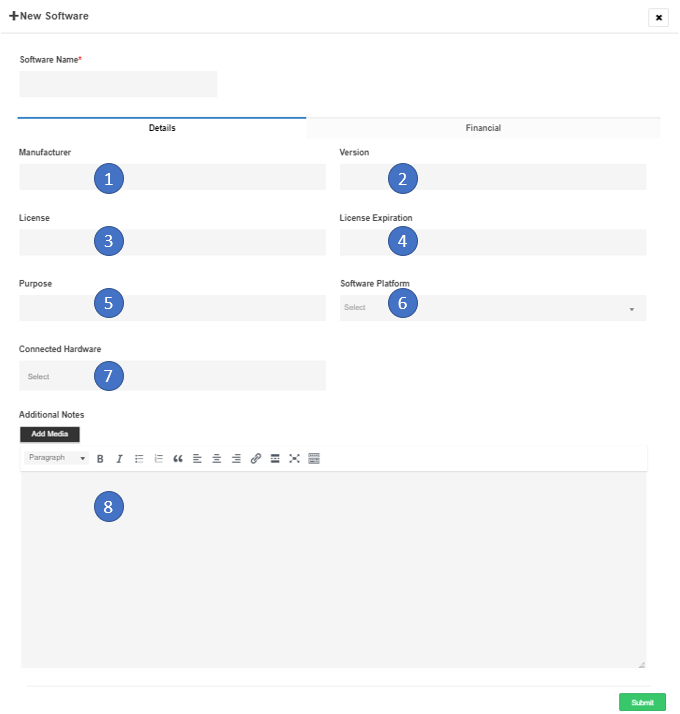

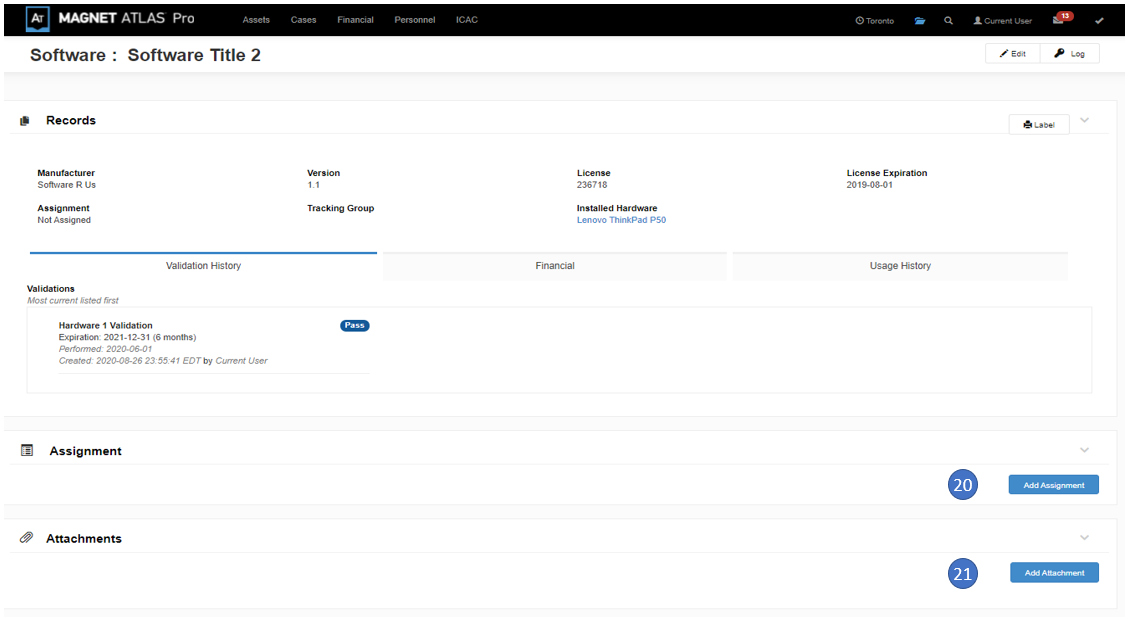
Complete the fields on the Add New Software page. Like the name of the software, most of the fields are self-explanatory for purpose.
The Software Name is the short version users choose when doing casework. This name is displayed on Assessments, Items and Exams, as well as within Equipment Stats when selected so a short version is recommended for these purposes. Longer descriptions can be entered in the following fields.
Quality management selections control validations associated to Resources and Assets. Enabling this functionality occurs on the Quality tab within Settings.
A written procedure used to validate an asset (HW or SW) would be a Resource. Assets would be tested and receive a current validation based on successful testing outcomes guided by a written procedure in Resources. The opposite could also be true. Testing with software and hardware assets could validate a workflow that is written and maintained in Resources.
Validations are created from the Assets top main menu. Create a validation by selecting the blue “New Validation” button. Validations are related to documented processes and workflows in Resources as well as the quality or consistency testing of, or with, Hardware and Software assets.
Validation Details tab on a new validation record contains the name or the validation, date of validation, expiration, type and validation status.
Validation Connections tab contains the links to Resources, Hardware and Software. Under each topic the user selects the title of the resource, and hardware and/or software being made part of the immediate validation record. After selecting the name of each the status is define per selection. As an example, validating a procedure which is in Resources would have the selection read that the Resource pass, failed or is expired. These terms are defined within the Quality tab in Settings. When this resource is used as the process to validate one of the assets, on that validation it would likely be listed as “involved” whereas the asset at the focus of the testing would then pass or fail the validation event.
Validation note tab allows editing of notes created on a validation. Attachments and validation notes are more efficiently added by closing the validation edit modal and adding them from the Validation page view.
When using the validations functionality users receive feedback from associated fields on the edit modals for Items, Exams, Assessments, and on Validations. When there is no current validation recorded for an asset, or resource in the case of completing a validation, on the edit modal of the current record the user will see "(NOT VALID)" beside the name of the asset. This text is not displayed on the page view for that record. It is intended as informational notification to the user the current asset being considered for use doesn't have a current validation associated to it. In some instances certain assets may not require validation, so the system doesn't prevent the user from selecting it. It merely informs the user at the time the asset is being considered of the current validation status.
Strict Mode is an option for Validations in Settings. When enabled, assets and resources with no current validation are not displayed within the lists on edit modals for validations or connected hardware and software on Items, Exams and Assessments. When using Strict Mode, users may need to create one validation labeled "Not Required" so they can link any resources or assets that do not require validation to enable them to be seen in associated lists for connections on the aforementioned records.
Validation page view:
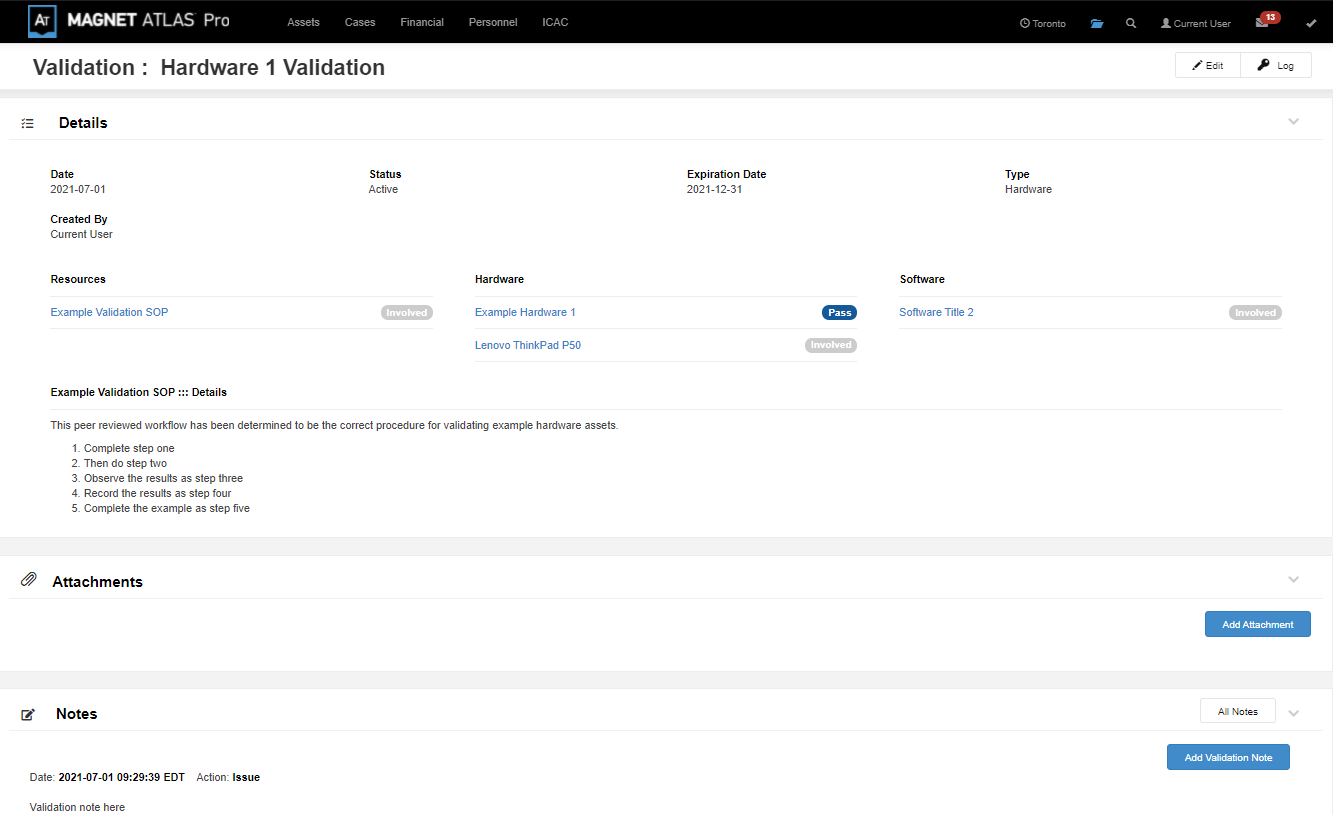
Validation Edit Modal:
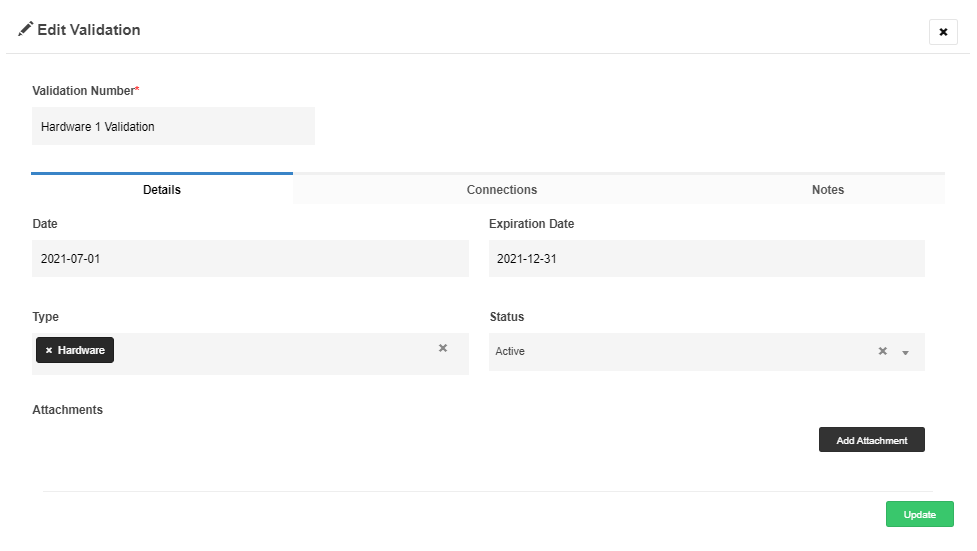
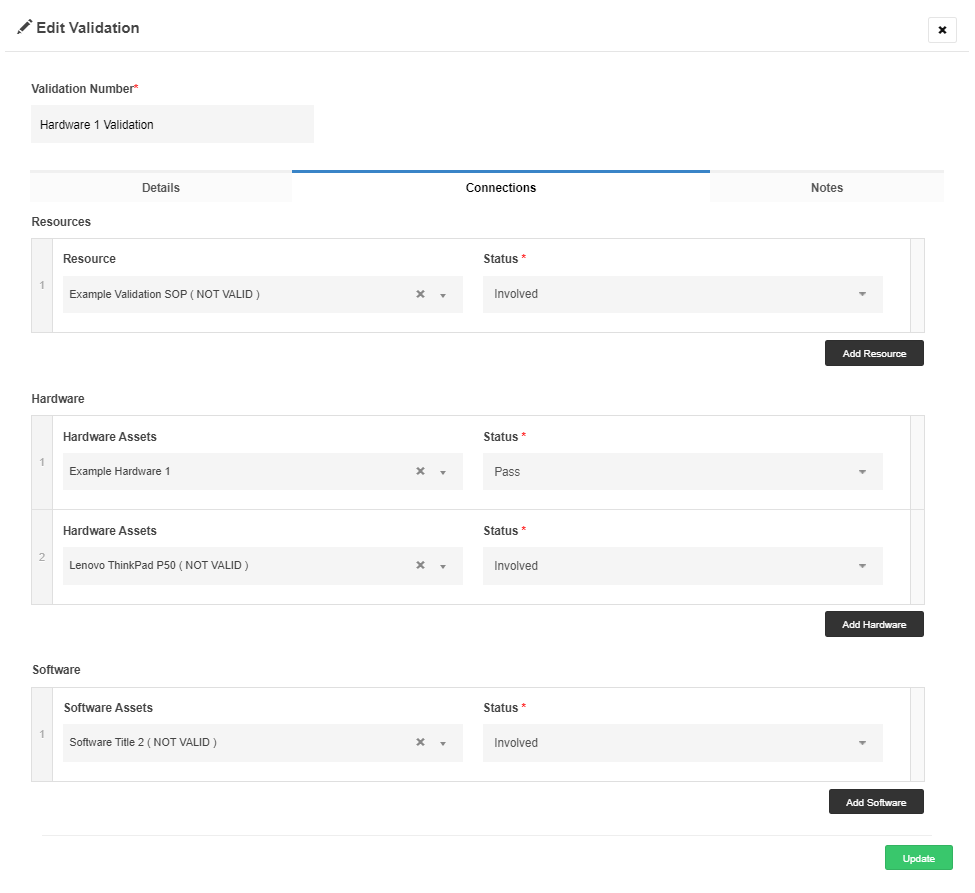
The Personnel menu contains two tabs labeled Personnel and Courses. Establishing a personnel record is the first step of documenting formal education and job experience. The second step is creating courses which are linked to the personnel records to build out the professional development sections. This action permits the update of training records by linking one or more attendees to a single course.
There are three tabs on the Add New Personnel page used to create a new personnel record. The tabs are general, education, and experience. After completing the general information tab, select the “Add Education” and “Add Experience” buttons to create as many entries on each of those corresponding tabs as necessary to include all the user’s formal education and work history.
Creating courses and linking those courses to the appropriate personnel records is how professional development is added to the training records. Linking those courses to accounts create entries within those associated accounts to document expenditures incurred as part of attending the linked courses. Link the attendees to the course by selecting them in the Connected Personnel field.
Course expenses are tracked by selecting the Add Expense button on the course. Repeat that method to make entries for any number of attendees. Expenses can be tracked for attendees whether they have personnel records in ATLAS or not. An example may be an entity who sponsored training for someone for who they don’t maintain training records.
Accounting is summarized in the Financial section of ATLAS. Billable hours, expenditures related to investigations, asset purchases, general expenses, and travel training expenditures can all be tracked in the system. Within the Financial section are Expense Reports, Invoices and Accounts. These three sub-sections each play specific roles in the accounting process within the system.
Expense Reports are used to report expenditures incurred by the lab during investigations, and also general lab expenditures not directly associated to specific investigations. When expenses are general operating style expenses unrelated to specific casework, expense reports are created directly from the Financial menu and linked to the appropriate funding account. If expenses are related to services, and intended for billing, the expense report should be generated directly from the associated case and linked to an invoice. Invoices may be linked to client accounts when needed to track multiple expense/invoice transactions. Line item billable expenses for services may be created directly from the note modals used to create Case Notes, Examination Notes, and Item Notes. Expenses may be filtered by year and period to create expense summary statistics.
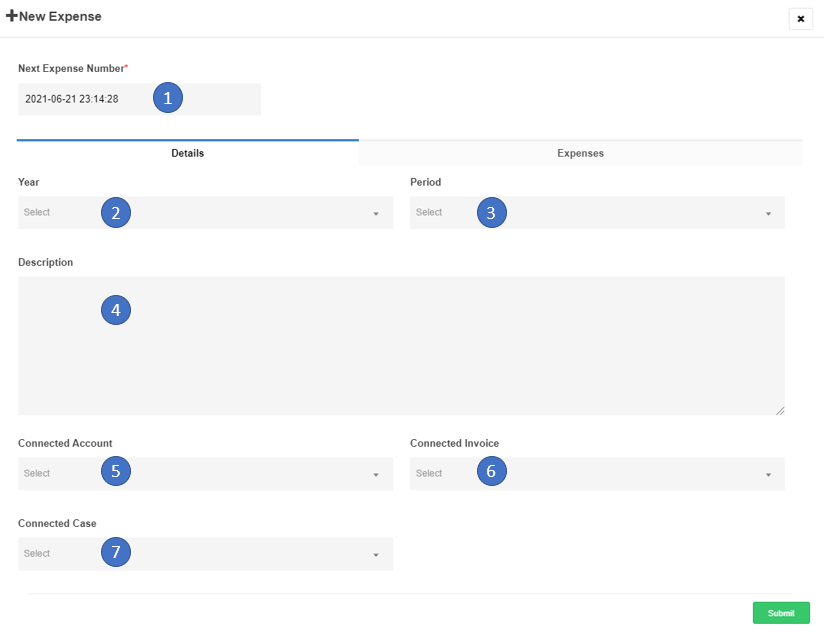
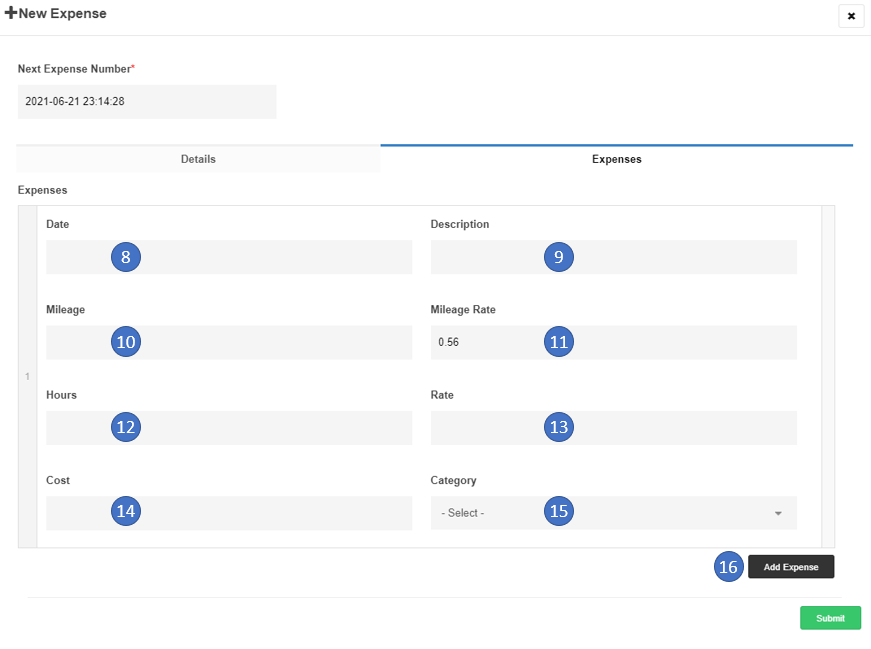
Complete the fields on the Add New Expense page. Many of the fields are self-explanatory.
The details tab defines the administrative treatment pertinent to the immediate expense report.
The expenses tab records the transaction specific financial information pertinent to the immediate expense report. One or more expenses may be listed on each expense report by selecting the “Add Expense” button.
Invoices are used to compile expense reports into a single record. Invoices may be created from the case page to automatically link the invoice with that case. Invoices may be created from the Financial section also, and the case link can be defined while editing the new invoice. Invoices may be created for single sales events by linking appropriate expenses to an invoice. Invoices may be linked to sales accounts when needed to record reoccurring client account activity. Payment information may be included on invoices to document retainers and payments for billed services. In addition to date related and case related filtering, the invoice index is filterable by invoice status to create statistics to assist with analysis of both billed jobs and work in progress.
The expense details that populate an invoice come from one or more linked Expense Reports. Users might choose to create monthly invoices and aggregate expenses for that month on the respective invoice.
From either a case page within the Records tabs or on the Invoices Index with the Financial section, select the blue button to add a new invoice.
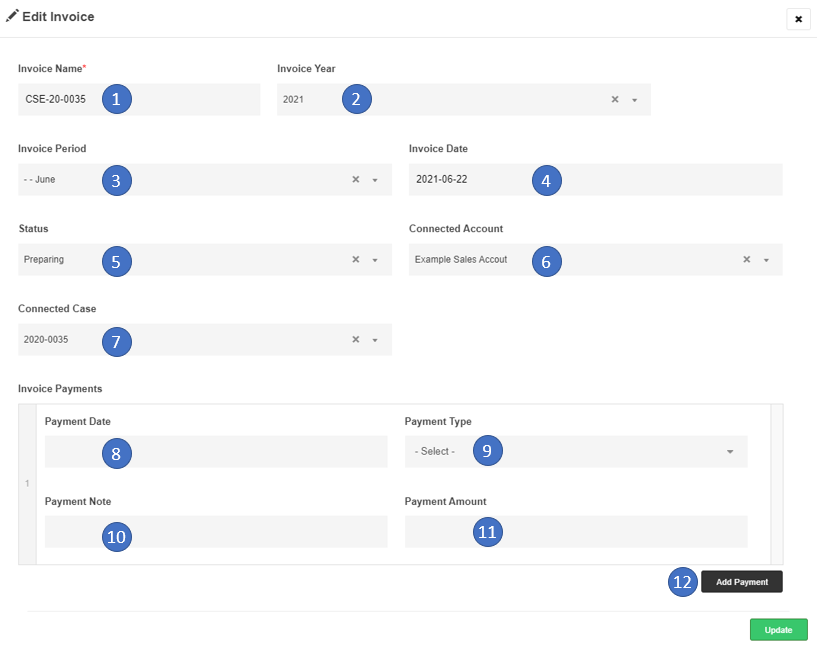
Populating Invoice Fields
Accounts are created from the financial menu. The two types of Accounts are general operating style, and sales (accounts receivable) type accounts.
General operating style accounts manage expenditures and create summary information by linking expense reports with categorized expenditures, by linking travel/training expenditures from within courses, and by linking hardware and software purchases to the appropriate funding account.
Sales (accounts receivable) style accounts may be used to record recurring client account activity. Sales accounts are populated by linking expense reports to invoices, and then invoices, with associated billables, to the appropriate sales account.
The only direct data entry required for operating style accounts occurs during the initial creation, deposit recordation, and projections entry and maintenance.
The account information tab is general information to title and initiate the creation of the account.
The projections tab defines the spending goals intended to meet the budget recorded on the deposit tab. Projections are expenditure goals for personnel, travel, equipment, supplies, contracts and other. Expense categories are generalized and fit into one of those categories. Linked expenditures are calculated into the projections to provide current analysis of previously defined spending goals. Projections may be modified at any point by selecting the “Modify Projection” button to adjust the current projected amounts.
The deposit is the budget endpoint for the current fiscal term. Any linked expenditures are calculated to provide balance information on demand based on the current deposit amounts. Both projections and deposits may be adjusted positively, or negatively as financial conditions require. Adjustments to the deposit values are completed by selecting the “Add Deposit” button.
The fields to create and maintain the account information are straightforward and self-explanatory. Additional information about the account, deposit and/or the projections may be added to their respective note fields.
Sales accounts work in a similar fashion to general operating style accounts except they are focused more on historical expenditures and services on behalf of a customer, or internal department if using it for internal corporate accountability. As an example, imagine a corporate lab team does a lengthy investigation on behalf of the legal or human resources team. The lab team may not actually bill or be reimbursed by the other team, but for planning purposes the lab team can track expenditures from their budgets on behalf of another entity within their organization.
Sales accounts also can be used to track hours allotted. An example for this type of accounting would be a customer, or internal corporate requestor, has been sold or allocated 40 hours of lab services. By using the note modals while actually doing the work, examiners may define the "billable duration" of activities which become a line item on an expense linked to an invoice within a case. The invoice is associated to the appropriate sales account which in turn debits the allocated hours.
After creating, editing, and saving a new Operating style account, users may view account information by opening the account and selecting the desired tabs within the account. Operating accounts have an expenditures summary tab, itemized tab, deposits tab, and projections tab. The expenditures tab summarizes all linked expenses from every source. In the right column categorized expenses are grouped, as well as any travel/training related expenditures, and hardware and software asset expenditures. All expenditures in the right column are also more broadly grouped and displayed in the circular chart on the left side of the page. The expenditures are grouped by relevance and presented as focused categories in a table that may be seen by selecting the Show Summary button below the chart.
The itemized tab lists all the linked expense reports. The details of the reports may be viewed there as well as accessing a navigation link back to the actual report for more review. The itemized tab also contains detailed information about linked assets and travel/training expenditures linked to the current account.
Values from the itemized tab may be filtered for a focused view, and either values from a focused view or the complete list of transactions may be exported as an .xls file for further analysis outside of ATLAS.
Values from the deposits tab are presented in two table views. The primary table is a log recording the dates and amounts of the associated deposits. The sub-table displays the current total expenditures and account summary balance.
Projections are similarly displayed in tabular format showing a log of projection entries and a table of current projection amounts, expended per category and remaining balance calculations.
After creating, editing, and saving a new Sales style account users may open the account for viewing. The top portion of the account lists the account name, any account notations and the number of approved hours, the current number of hours used, and the balance of remaining approved hours. Attachments can be included on the Accounts page. Linked Invoices populate the bottom portion of a sales style account and those invoices may be expanded for individual viewing by selecting the "show details" icon which looks like for arrows pointing outward from the corners of a square. The title of the invoice and the file folder icon open the invoices when selected.
Stats are available by filtering indexes within ATLAS. The terms which are the filters are the taxonomies defined by executive users within the system. See the Taxonomies section within the System Configuration section for more information on creating and managing taxonomies.
On the case index as an example, filters allow users to topically focus the index on case types, origins, case locations, personnel and more. Time focused statistics can be separate or in addition to the topically based filtered stats by using the date filter. Case filtered statistics provide the widest view of overall work within the system. This same filtering methodology for indexes is consistent throughout ATLAS. The available filters are relevant to the specific index in view.
To access the filter selections, the user selects the “Filter” button at the top left of the current index. Combine filter selections to create the criteria from which stats are desired. Select the “Search” button to activate the search and create the focused list of the current index.
The case index is used as an example below to determine some key variables about the eDiscovery cases in the system. By filtering by the Case Type of Administrative and then the sub-type of eDiscovery the system produced a focused Case Index of those cases. Once that list was created selecting the Stats button then displayed statistics relevant to that current list of cases. Since Case Tags were used to create additional stats within eDiscovery type cases this example shows how many of the cases have active holds, how many have holds released, and additionally of those cases how many have losses exceeding 50 and 100 thousand dollars.
Law enforcement agencies would create case types and sub-types relevant to criminal acts and could use Case Tags to aggregate additional information in a similar method by using tags such as weapons usage, drug overdoses, overdoses involving deaths and other important metrics.
Statistics from the case index are combined stats. If multiple team members collaborate on cases, the examination activities from those cases are combined. The “Leader” is the primary examiner assigned to a case, but all the work within the case would be included in case statistics. If individual examination statistics are needed on an employee level, the examination index may be filtered by the examiner name for more individual stats.
Case statistics are based on the year and period associated to the case. Because examinations have their own year and period associations, those stats filtered from the Examination Index are based solely on the examination date association. As an example, filtering the case index by a year and then June would return a list of cases meeting those criteria. The statistics would include those case level stats based on June cases, including data for any examinations which have been completed from June until the time of the filtered query. This does not imply the examinations were done in June. In most instances for organizations with even a minimal backlog, exams may be conducted in the months after the case was initiated and associated to a year and period. To produce results for examinations conducted within a specific month, users filter the examination index for year and period. The results for exams conducted in September of a year as an example, may be from June associated cases.
In lieu of using the Taxonomy Year and Period filters which produce the time associations described above, users may prefer to use the Date Filter when focusing any of the page Indexes. After the taxonomy filters are applied as described previously, users may use the Date Filter to focus the stats to any date range desired and may select the relevant date type for which to filter such as filtering the Created Date, Initiation Date, Completed Date, Approved Date, or Closed Date when related to the Case Index. The Date Filter on the Examination Index allows the user to filter by Created Date, Examination Date and Exam Approved Date. Even the Items Index can be date filtered to create a list of evidence based on time relevance rather than location relevance the way inventories are done.
The ability to select the date type from which to filter may be helpful for creating monthly reports. As an example, filtering by created date for whatever selected time interval produces the list of cases created for the defined time. Similarly, using the filter to focus the list of cases by completed date would create a list of cases that reached the QA review status during that time parameter. In practical terms one could say that was when all the work in those investigations was completed. Those cases may stay open for quite some time awaiting legal dispositions which means filtering by closed date may not produce the results expected if trying to aggregate stats for the number of cases whose work was completed for a defined time period.
While viewing statistics in ATLAS the user can also see a tab displaying objects with missing values. This allows users to easily identify statistically relevant fields that are currently not populated.
After filtering the Case Index by taxonomies and/or the Date Filter a new list of cases appears based on those filter criteria. Along with this new focused list comes the ability to view the data within the cases as a table by selecting the “Inventory” button located beside the Stats button at the top of the page.
The table contains entries for most of the Case Fields. Any fields within a case, such as notes, attachments, victims, and suspects, which may contain lots of content, the table displays a count of those entries instead. As an example, the inventory would show a case had three attachments, ten notes, one victim and one suspect. The content of those fields would not be shared from the table view. The table can be exported if additional analysis is required for external presentations. The system application log keeps a record of the user(s) accessing the table view.
Filtering the Evidence Items Index works in a similar fashion. Usually the Items Index is filtered by location and sub-locations to create an inventory. In addition to evidence stats, an inventory is created which is helpful for inventory control. The items inventory may be exported for external analysis or used to do audits within ATLAS.
Additional statistics are found on the home page for executives and manager level users. Metrics are provided with graphics to provide a real-time snapshot of recent activity and work in progress. Metrics update about once per hour but may be updated on demand by selecting the “Update” link at the upper right of the Metrics Page. Metrics may be exported by selecting the PDF creation button or selecting the appropriate “Copy” selection within metrics.
The general activity metric on the first tab is a trendline reporting the current and five previous months of cases accepted, cases assigned, examinations approved, and cases closed within those months. These data reflect when the task was completed, not what year and month association the cases or exams have. As an example, there could be June associated cases which were closed in November. The trendline activity metric would report all cases from any month actually closed in November, including the previously mentioned June associated case. This is a separate question from comparing the results of filtering the cases index for the status of closed and the period of November. The result from that search would produce closed cases which have a case date association to (current year chosen) and the period of November. It isn’t necessarily answering the question of which cases were closed in the month of November like the trendline chart and table presents.
The supporting table to view data within the chart may be expanded by selecting the “Show/Hide Details” toggle button below the graph. The case and examination titles comprising the stats may be viewed from the links at the top right of the graph. There is a progress indicator beside the Activity title on the graph. It compares the number of cases accepted to the number closed during the current six-month period. A negative number would indicate the organization has accepted that many more cases than it has closed therefore adding to its backlog of cases, whereas a positive number would indicate more cases were closed in the past six months than taken in thus reducing the case backlog.
There are “Show Details” toggle buttons adjacent to each chart on the Metric tab. These buttons not only show the details for the chart, but also assist in identifying the relevant object that has data that is not yet defined. Those data display in the details tables as “Not Selected.”
The backlog metric relates to evidence within open status cases which have no associated examinations that have an exam device type defined. Because defining the device type for an examination is one of the initial things to select when creating a new examination, if an exam has not reached this point the evidence is considered unaddressed and still shows in the backlog metric.
The total backlog number is displayed beside the Backlog label. It is the total number of evidence items within open cases with no associated examinations. The chart displays the items based on the item device type defined by the user. If there are any items which do not have an item device type chosen, they may be viewed by selecting the “Details” link at the top right of the chart.
Device types for both evidence items and examinations are discussed within the instructions for taxonomy configuration.
There are a set of operational statuses within ATLAS. As an example, when a case is assigned to a case leader the status automatically changes to assigned. Similarly, when all the work is finished, and the casework is ready for a formal review the submission for review changes the status to complete. When the review is done, and the case is formally approved, the status changes to reviewed. And when it is finalized and closed, the status changes to closed. See the taxonomies section for more information about editing taxonomies.
The status metrics display a chart for current open status cases. The chart directly reflects the current status reported for each open status case. Filtering the case index by status provides a focused list and statistics based on the selected status for those cases.
The total number of open status cases, including sub-statuses of open, is displayed beside the Open Cases label above the circular charts on the metrics tab.
The case leader is the primary examiner in most instances but is best described as the person responsible at the case level for seeing the immediate investigation through to a conclusion. A case may have more than one case leader assigned. However, in most cases there would one case leader, and any others assisting or collaborating within the case would be added to the dissemination (restrict access) list.
The case leader metric is displayed as a circular chart with its accompanying table beneath it. The data indicates how many open status cases each team member is assigned as the primary examiner or as the title implies, the case leader.
Submitting investigators can select the Urgency indication based on the list created by Executive users in settings. The urgency metric displays a chart indicating the urgency selection for all open cases. The urgency selection on a case may be edited by the examiner(s) working the case.
Case types are defined by editing the taxonomy in settings or by adding case type terms while editing the Case Page. Case types may be nested during those edits to create sub-types. Case types are then selected and associated to cases while editing the case page.
The case type metric is displayed as a circular chart with its accompanying table beneath it. The data indicates the current case type definition associated to each open status case.
Access for cases is controlled by the dissemination list on each case. Each case has a leader and may have more personnel assisting on the case. The access chart allows users to see users assigned to cases for with they are on the dissemination list.
Case origin generally describes the agency, organization or client requesting forensic services. For external requests, the origin may simply be the name of that requesting agency, organization or client. For internal requests for services, origins may be precincts, shifts, bureaus or corporate departments.
The case origin metric is displayed as a circular chart with its accompanying table beneath it. The data indicates a breakdown of the case origins for each open status case.
Case locations generally describe the jurisdiction or geographic region from where an investigation is requested. Location may be closely related to origin as well. As an example, there may be several agencies or clients who request services from the same jurisdiction or region.
The case location metric is displayed as a circular chart with its accompanying table beneath it. The data indicates in what location each open case is associated.
The second tab on the home page is a utility to analyze activities aggregated from notes throughout the system. Notes are used to document case related information primarily within investigations at the case level, the item level, and the examination level. When notes are populated using “Note Actions,” which are the dropdowns which generally describes the main topic of the note, and durations, which is the time associated to completing the task in the notation, the aggregation of these data present themselves for analysis both within the case the notes are created and combined on the home page for a system wide view of activities.
The “Activity Feed” is a dynamic chart that users may filter to focus the feed more closely. The filters allow users to filter by time periods, by users on the case, by source records types, and by the actions. These are multi-select filters which can be chosen in any combination to present the information topically and quantitatively as needed.
Once the filters are applied, users can view and copy the chart for use in external presentations. They can create side-by-side charts to compare activities from one time period to another as an example. They can view tables comprised of the filtered activity data and export those tables. Users can also review the information as a timeline from which the activity times are derived.
Starting with the “Views” selector at the upper right of the Activity tab, users can select what content to display on the page. Selecting the “Comparison” view creates a side-by-side view of the other selected content blocks. Users may display the content as a chart, summary, timeline, and/or tables which display totals and details. Any combination of these content blocks may be selected for analysis.
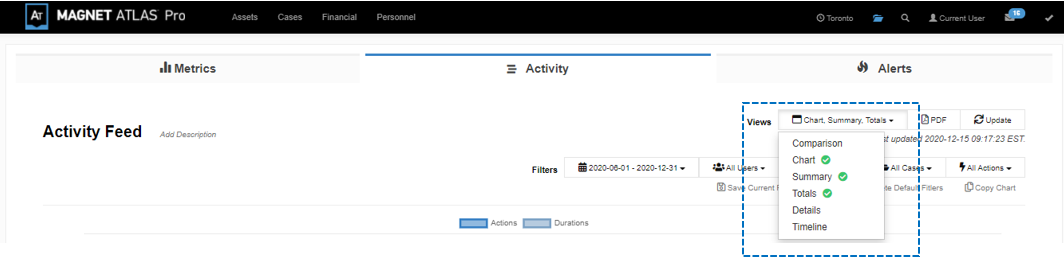
The filters are used to focus the results within the activity charts and tables. Users may filter the information with any combination of date parameters, users, record source types, cases, and actions. Users will notice “All” and “None” buttons at the top of each filter list to quickly select or deselect the entire list. Users may use the “None” button to deselect everything in the list and then manually select one or more choices to create the desired list of selections.
Using the calendar selection filter creates time parameters for activities to be included in the results. There are several pre-sets available such as this month, last month, this year, last year. The custom range setting allows users to define any time parameters by selecting a beginning and ending date and applying the filter.
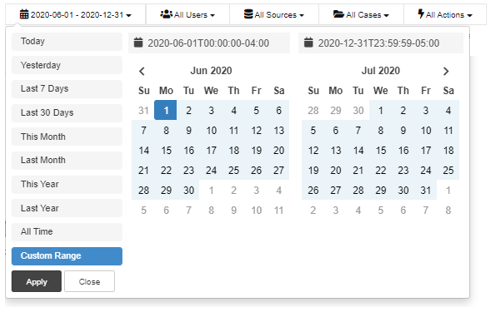
The “Users” filter allows the viewer to focus results on any one or more users who have created notes within the applicable data.
The “Sources” filter is a way to define which records will be viewed from which activities are aggregated. As an example, selecting only cases and using the action filter of only created would provide statistics for how many cases were created within the defined dates. Whereas selecting all record source types would provide all selected activities for a defined date parameter.
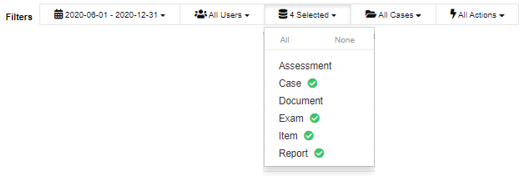
The case filter is exactly that. Users can select one or more cases to focus stats more narrowly when necessary or leave the selection to include all cases and rely on other filters to focus the data.
The actions filter is where users select the terms they have created as “Note Actions” upon which the aggregation of activities and activity durations are based. The system also populates actions for created, assigned, approved, and closed for appropriate record types. The durations assigned by the system for these actions are defined in Settings>Interface.
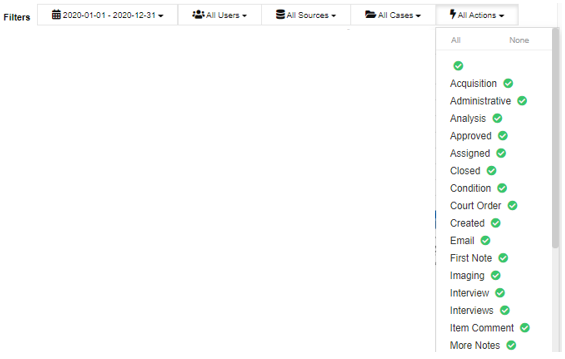
Users may select the “Save Current Filters as Default” button to retain the filters chosen for view upon each return to the activity tab. Likewise, the “Delete Default Filters” button may be selected to clear the previously saved selections.

The Summary section is an aggregation based on filter choices or source record types, action counts and durations and billable durations for those actions. Data size is also included in the Summary section. Filtering for evidence items and/or examinations for a given time will display the amount of data associated to those intake and examination processing activities.
The Totals table displays grouped totals for action types along with each action’s count, duration, and billable counts and durations if populated.
The Details table displays the specifics about individual actions related to the note activities.
Exporting activity information for external presentations may be accomplished by selecting the “Copy” button adjacent to each section. Additionally, the Totals table and Detail table have CSV or JSON export buttons when needed for external analysis.
By using the different filters users can create stats as well as locate records based on any of the criteria for which filters are applied. Planning what action terms to use for each record type has a direct effect on the ability to relevant results throughout the activity analysis.
The Alerts tab is located on the home page. Alerts are currently created by three events in the system.
Users who require document retention notifications can facilitate this by populating the “Purge Date” field when the case edit modal is open. The “Purge Date” does not display on the case view. However, it does activate an alert on the home page on the date defined. The system does not actually purge anything. The alert is simply a reminder the user has defined a future review date for the case in question.
Document alerts are created by creating the like named “Document” record type within a case. The document alert displays on the home page on the date defined like the purge type alert. However, the document alert may contain a summary of why the alert was created, and there can be more than one of these per case unlike the purge type alert which is only one per case.
License alerts relate to assets which were entered into ATLAS that have associated terms with expirations. Unlike the other alerts these alerts appear with some lead time which is defined in Settings>Interface>License Reminders.
For each of the alerts the titles are links to the associated records, and the links can be used to quickly navigate to address the alert in question.
Inventory control for both the evidence item inventory and asset assignments can be accomplished within the auditing section located on the assets menu. An audit contains several self-explanatory fields for date, duration, years, periods, audit types, audit type, location and agency, as well as a synopsis field to record other pertinent information.
The audit utility works by comparing two files. The “Inventory file” is created by filtering the evidence item index, or the assets index to create a list within ATLAS for the filtered information. The focused list is exported for audit and uploaded into the current audit. The “Scanner file” is created by using a 2D scanner to create a list by scanning the QR codes created within ATLAS and affixed to the items or assets which are the subject of the immediate audit. The scanner file is uploaded into the immediate audit and the audit is completed by selecting the green submit button at the bottom of the audit editing modal.
After selecting the submit button for the audit simply open the audit to view the results. The audit will report as consistent or inconsistent. If the audit is inconsistent the record will display what inconsistencies exists between the inventory and scanner files.
Located on the main cases menu, the resources tab is designed to be used as an in-house library. Resources is a good location to maintain current information such as workflows, research, directives, standard operating procedures, miscellaneous forms, or any other information. By maintaining the resources library users have consistent access to the most current team information.
The vendors utility is located on the assets menu. Like resources, the vendors utility is also an in-house library, but this one is to maintain vendor contact information for the team. The vendors listed within the utility may also be linked to asset expenditures for reviewing historical transactions.
In the top right menu bar is an envelope icon which activates the messaging utility. ATLAS users may use this tool to send brief messages to any other ATLAS user. The utility shows the current user how many unread messages they have in a blue bubble beside the messages icon. The system (if configured to allow external email) sends a notification email to the intended recipient of the message alerting them to the existence of the ATLAS message. That user would have to log into ATLAS to see the content of the message.
Located beside the Messages icon at the top right of the menu, a check mark icon activates a modal for the user to view the current expiration, number of authorized and active users and storage capacity for their current system. ATLAS VM updates are also applied through this utility on local deployments.
Email support@magnetforensics.com for Magnet ATLAS support.